Afternoon,
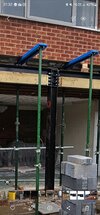
I am soon to take delivery of the structural steels in preparation for a knock through on the rear of our house. The delivered steels will support the existing first floor at the rear of the house and also the joists for the new flat warm roof on the new rear extension. The steels have all been designed and specified by a structural engineer with underside of the steel being flush with underside of the joists, building control drawings show timber packers to be used in the web of the steel with jiffy hangers supporting the new joists.
The steel beam specified is a 356x171x51 UB only one web of the steel will need to be packed out to pick up the new 47x225 joists (the existing house joists run parallel to the UB).
I make the depth of the web to be packed out as 82.1mm, in order to pack out the web sufficiently could I use a 76x222 C2 joist and fix a strip of 6mm plywood along the back of it pack before bolting it to the UB? That would put the face of the packing near enough flush with the edge of the flange or is there another, simpler way to achieve the same?
I'm assuming the packing is best flush with the flange if not a little more proud to make fixing the jiffy hangers easier.........
Thanks