Rotten lintel and joists

Joined
11 May 2020
Messages
18
Reaction score
1
Country
United Kingdom
DC85B6EC-4149-4DA3-AF1E-B7F832CD9953.jpeg
76E532A1-E758-4383-A628-DBFB80946B0E.jpeg
Hi folks,

I‘ve encountered some rot on our Victorian terrace home and I’d very much appreciate some advice.

Firstly, a couple of joists closest the front door were totally rotten- I think the old doorbell wire was acting as as a wick and directing water onto them for a hundred years or more! The house and next door were also very neglected when we purchased so probably a bit of that too. The trouble here is that the joists rest in the walls rather than on wall plates. Therefore i can’t see a way to wiggle a replacement in to the same spot. Should I bolt/resin a small wall plate in and hang via joist hangers? Any other ideas or more simple methods?

The second things is that I also discovered a rotten wooden lintel above the basement level floor. The two runs of bricks above it are also loose to the touch. This is an area where we’ve had damp problems and so I’m keen to safely replace the lintel but avoid creating damp with a concrete block or metal condensing moisture.

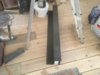
I’ve attached a picture of the basement door (with the lintel above) and the area where I removed a rotten joist (also above this door/ below ground floor entrance). Sorry, not sure how to orientate them the right way.

I’m sure there’s a simple solution to both these issues, I’m just not that savvy with DIY so would appreciate any insights from those with more experience.

many thanks,
Daniel
 
Sponsored Links
Replacing a joist into a pocket in the wall is relatively straightforward. You ensure the one pocket is deep enough to allow the joist go in far enough to allow the other end to then go into its pocket. You'll need a minimum of about 75mm bearing for each end of the joist in the pocket.

As for the replacement of the lintel, I would probably use a couple of needles in your situation, due to the precariousness of the brickwork above.
You could position the needles a few course up to allow re-bedding of some of the brickwork.

for advice on choice of lintel, details of the wall will be required, e.g thickness, cavity, etc.
 
Hi Bobby,

Thank you for considering my post and taking the time to reply.

I’ll cut a joist with +20cm on the length and see if I can wiggle it in. The joist goes right through the wall into the front room (where it’s not rotten) so I need to trim that edge in the wall and make sure I leave it secure too. Will it be ok just to bed it with lime mortar? (That’s what’s used already).

The lintel is set into a solid brick wall, two bricks deep. I can wiggle the two courses of bricks above it easily by hand. I’m wondering if I could just remove them as they don’t seem to have any weight on them? The area directly above is the main front door so no real weight directly above. What do you think?

All the best,
Daniel
 
C54A5D41-DD5B-4001-BF02-2F27CAED5D5E.jpeg
I had a closer look and discovered the joists rest on wood running horizontally on the bricks. Most of it is ok but the bit at the front (under the joists I need to replace) is rotten.

The other thing is that the wall the joist rests on (hall/sitting room) is only one brick thick so difficult to maintain 750mm on both. Should I look to widen the hole and overlap?

image attached.


many thanks,
Daniel
 
Sponsored Links
75mm, not 75 cm (=750mm)! A single course wall is 100mm (10cm) thick, therefore it is sufficient.
Rest the joist on the timber, no need for mortar.

I would still tend to use a couple of needles, or a couple of Strong Boys, just higher than the loose brickwork, and as you wish, remove and re-bed the loose brickwork. It's not easy to see what is being supported under the door, plus it looks to me like you'll have to dig out some of the wall that is perpendicular to the lintel for a bearing, i.e. widen the void, leaving even more unsupported.

Measure the length required allowing for 100mm (10cm) bearing each end, (assuming an opening less than 1 metre), the width of the wall, and ask at the local builders merchant for one to suit. They'll know what's needed. unless any pros on here can recommend a suitable lintel. It will need to be bedded on mortar each end.
 
Sorry, yes- I meant 75mm! The issue there is that this was one long joist, running through both the hall (through the wall) and front room. So I’d need 75mm for the new joist and 75mm for what’s left of the existing (the sitting room side). Unless I make the opening wider and put them alongside each other?
 
Sorry, yes- I meant 75mm! The issue there is that this was one long joist, running through both the hall (through the wall) and front room. So I’d need 75mm for the new joist and 75mm for what’s left of the existing (the sitting room side). Unless I make the opening wider and put them alongside each other?
As long as the intermediate wall is sound enough to support the joists, there is nothing wrong with splitting the one length into two shorter ones.
You will need a wider pocket in the intermediate wall, and one of the other pockets might need to be moved along slightly, to keep the joists parallel.
 
Thanks Bobby,

I think the correct order will be to get the lintel in and wall above the door sorted, then the joists?

The builder’s merchants were unwilling to advise (due to company policy/liability) but I think this looks like the right sort of thing-
https://www.travisperkins.co.uk/ste...el-lintel-standard-duty-1200mm-cn71a/p/865798

At least it’s insulated and should help prevent or at least not contribute to some of the damp issues. If anyone has any thoughts on that, I’d be much obliged.

Many thanks,
Daniel
 
That looks like it'll do the job. Note the lip for the soldier course goes outside.
In my experience there is a slope to the lip, (for moisture to travel outside) which causes problems getting the blocks/bricks set properly.
Either use wedges to hold them in place, or immediately set the upper block/brick to hold it in place.
Perhaps the pros have a 'trade secret' for doing this.

Yes the insulation does not prevent damp, as in ingress, it helps to prevent condensation, which gives the same result.

I'm not up to speed whether a drip tray should be used or how it should be installed. I suspect one should be installed due to the positioning of the lintel, in relation to the building.
 
Thanks Bobby,

This area doesn’t get any rain directly, as it’s kind of under the front path, if that makes sense. Though taking the quarry tile path up and relaying on a membrane is my next job... Trying to eliminate the potential damp contributors, one by one. As long as the insulation is there, the spongey rotten wood removed and the concrete-type plaster replaced with lime, I think it should be an improvement. Can’t be any worse anyway! Thanks again for all your help. I need to find somewhere that’ll sell me a few bricks and hire some strong boys and I’ll get cracking. All the best, Daniel
 
Hi Bobby,

I’ve got a support in and opened up a bit more. I can see there’s an arch brick support on the second row of the wall.

I’m wondering what I should do next? My uncertainty is about how I should get the lip on the back of the lintel in below the arch?

should I grind or drill out a channel and knock it in?

i don’t think I can just take the bricks out as there’s a gas pipe running along the front above the door!

should I just swap the lintel for a solid cuboid shape lintel, without the lip?

Any thoughts or advice welcomed.

many thanks,
Daniel
 

Attachments

  • 5BBBFFD9-2B57-46F0-A617-0842E8B83E1F.jpeg
    5BBBFFD9-2B57-46F0-A617-0842E8B83E1F.jpeg
    277.8 KB · Views: 296
  • B6851A81-F963-4DC4-8FB3-C8825E2966B8.jpeg
    B6851A81-F963-4DC4-8FB3-C8825E2966B8.jpeg
    235 KB · Views: 256
If the arch is sound, you don't need a lintel for that skin.
Just swap the lintel for a single skin lintel for the inner skin.
 
Damn. I already started. I bolted some c16 to the outer wall and propped that with the strong boy for support. Have been drilling through under the arch... may as well carry on. Probably better to have this lintel in as it’s insulated. It’s just been a bit tricky!
 
7381E616-C8AE-48EF-BDB8-9E8CC7807D09.jpeg
Got there in the end. (The missing brick on the right is for where I’m going to re-route the water main). Thanks for all your help.
 

DIYnot Local

Staff member

If you need to find a tradesperson to get your job done, please try our local search below, or if you are doing it yourself you can find suppliers local to you.

Select the supplier or trade you require, enter your location to begin your search.


Are you a trade or supplier? You can create your listing free at DIYnot Local

 
Sponsored Links
Back
Top