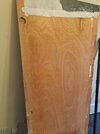
Hard to tell which ply it is from a pic though the colour does suggest it's hardwood, softwood tends to be lighter. No matter, as long as it's tanked well and properly supported.
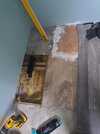
Looking at that space, I presume the shower will be sitting against the left and top walls therefore best to fit the dwangs along where all the outside edges of the tray will sit, then lay the 18mm screw tight to the joists/batons then use some silicone to 'glue' the 3.6mm on top and screw that down onto the board @ 150mm spacing with 25mm screws and that will increase the whole board thickness to 21.6mm. Then tape all the corners/joins (primer the space, then a coating of membrane in the corners/joins and stick the edging tape to that then paint over it to seal) and at least 2 coats of the membrane - let one dry properly first.
Again, as far as the plasterboard is concerned it doesn't really matter if it's moisture resistant, TBH there isn't really such a thing but again just tank it well.