Slow going - my double storey extension build

The furry foreman?

S3VbcmohkdGhcKNwfm.webp

Haha. Milka our cat has been keeping an eye on my throughout this build, mostly because I’m messing with her garden. I might have to buy her some overalls.

Water, drainage, electricity. That garage will need its own door number and postcode!

Yeah, I said at the start I wanted the ability for the building to be converted to other uses if needed. In my head I can see how I’d set it out as a granny annex in the future for my parents (if needed).

I’d probably do the same or if we decide to sell the house - fill the garage door in a pop in a small bathroom. It could be a granny flat, or a studio or a really fancy garden office…either way it’ll add more value that a house with two double garages :)
 
Time for a mini update with some progress with the garage build. Been a busy couple of months with a few tips abroad for business and pleasure, and the weekend weather hasn’t often been kind to make progress.

I got the rest of the brickwork done with the engineering bricks, which takes me up to damp proof course and to the depth of the floor level on the inside.

As per the pic below you’ll see the blocks on the right hand side but on on the back edge as that’s were my bifold doors will go, so the concrete slab goes to the outer skin of the building.

100mm of MoT1 was put into the inside of the extension, which was then whacked to within an inch of it life.

Around 25mm of blinding sand went in top of that to protect the damp proof membrane from the sharp hardcore. In reality it’s more than 25mm of sand in places, but you need it pretty level to support the insulation evenly.

I use metal conduit pipe and my screed level to get it flat. Milka the cat didn’t appreciate my attempts to level, so did her own efforts :)

IMG_4829.jpeg


DPM starting to get laid. Shot of my brickwork too. The foundation blocks and first layer of bricks will be underground once the garden is reinstated.

IMG_4827.jpeg


100mm PIR boards going in. Clare doing a good job of taping up the holes in the DPM where the pipe and cable went through.

IMG_4826.jpeg


I had the rebar in and then building control come out to check everything before concrete. They wanted an extra layer of DPM on top of the insulation, which wasn’t on my plans…but BC get what BC ask for, so I had to cut all the tied rebar, take it all out and then put another DPM layer down, before putting the rebar back in.

Managed to put a bad gash in my leg scraping it on the rebar when that was done too, which added injury to insult!

However, finally the rebar was back in and tied, with 75mm spacers under the rebar (as I was having 150mm of concrete).

I hired a 7m tamp and an easy float to make the levelling of the concrete easier - you can see the tamp poised for action in the foreground…and a few scaffolding boards to help the barrow man.

IMG_4825.jpeg


Concrete staring to go in. There was only one guy on the wagon, so he barrowed 6.7 m3 of concrete in 90 mins on his own…the guy was a machine!

It had rained cats and dogs throughout the night beforehand, and that why you can see a lot of water on the on the DPM.

IMG_4824.jpeg


Didn’t get any pictures of the tamping or the easy floating unfortunately. Had a mate come over to help, along with Clare, which was handy for using the heavy tamp.

I didn’t get the smoothing perfect, but good enough for a garage floor.

IMG_4823.jpeg


Now ready to get some blocks laid.

Spent £150 on sand and hardcore for the sub base, and £50 of the DPM and another £50 on tape to tape it all up. (Insulation and rebar had been bought earlier with the bricks etc), £120 on hiring the tools and the concrete came to £1,250. Round it up to say £2k for the stuff I’ve forgotten I’ve bought.

So total garage spend so far £20.5k, total overall spend £139.5k.

Cheers folks
 
Last edited:
Are you going to seal or paint it? When we had a workshop built for work once, it was power floated after the conc was pumped. Was about 15mx50m. Absolutely smooth as glass and spot on level (it had to be for the mot bay regs) as well as being as tough as nuts.
 
Are you going to seal or paint it? When we had a workshop built for work once, it was power floated after the conc was pumped. Was about 15mx50m. Absolutely smooth as glass and spot on level (it had to be for the mot bay regs) as well as being as tough as nuts.
Yeah, thinking about some kind resin floor.
 
So onward with the block laying, have had tons of pallets of blocks delivered.

I’ve gone for plasmor fibolite 7nm blocks for the exterior and thermolite 3.5nm blocks for the inside. I used the plasmors for my extension, and I like them as you can lift and lay with one hand. The 7mn isn’t needed for the build, but will take the render better at the end of the process.

Setting out before getting started:

IMG_5113.jpeg


I was able to get a course laid each day, with all the cuts and faffing.

Weather wasn’t playing ball so I had to stop and start a bit.

IMG_5112.jpeg


IMG_5111.jpeg


I didn’t think I’d need a scaffold for this build but I bought a couple of staging boards to help with working at height. Forgive the blocks holding it up; I don’t have space for a trestle on that end.

Even more sketchy:

IMG_5108.jpeg


I did make a boo-boo as I decided to go against my plans and shorten one corner to give more space on the other size, but then I was reading up on minimum returns being 665mm and I was at 610mm. I might have got away with it, but I want things done correctly so (after 8 courses) I decided to to take it down and do it right. Waste of a day, but hey ho.

I post my mistakes so that others can learn from them.

IMG_5109.jpeg


As it’s stands, currently nearly finished the 9th course so pad stones are going in and steels are on order. Still going….

IMG_5107.jpeg


All the blocks for the build and a few lintels came to £3k and the staging boards were £500.

So total garage spend so far £24k, total overall spend £143k.
 
Wow, the time seems to be flying by again! 6 weeks on and time for another update. Summer has been busy with holidays, friends visiting and other social things so to be honest I've not made a huge amount of progress...but to be honest (again) after the extension build which ate up a lot of my time, I'm happy this time around with the work/life/DIY balance.

I got the walls built up to the top of the gable and installed padstones wherever there was going to be a steel. Had a little helper come join me on my scaffold who got up there with some mission impossible style skills.

Screenshot 2025-09-14 at 22.44.34.png


Steels came from a local firm and I learnt my lesson from the extension build (where I failed to do this) so they were drilled in the web so I could install timber into the web. I should have actually that the tops drilled too for the wall plates and top timber on the ridge, but I was able to use TechFast screws to fix those...but it was more faffing that I would have liked.

Screenshot 2025-09-14 at 22.45.36.png


I hired a genie lift and roped in a mate (thanks Wayne) to get the steels into place. Not sure which was the heaviest steel. The front and rear ones have a steel plate to hold brickwork, which the centre beam has 9 x 3s in the web on either side which adds to the weight.

Screenshot 2025-09-14 at 22.44.57.png


There's always a bit of jiggery-pokery when fitting steels to get them all level and centred, especially the ridge beam which is longer than the room its going into (and very high up) so pivoting the steel while up high is nerve-wracking but we got there in the end with all three beams in place.

Screenshot 2025-09-14 at 22.45.09.png


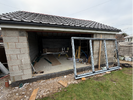
You can see in the above, the gable walls aren't yet fully built. That's on purpose as you have to put noggins through the roof rafters to the outside to support the roof elements that stick out beyond the wall - think there's called gable ladders. As I will be making my roof (rather than buying trusses), I didn't know where those would sit exactly. Therefore it's better to keep the walls lowish, and then fill in the block work later ones the gable ladders are in place.

I then had to install wall plates on either opening. Not sure if I've done this right as I needed to pack up to get to the block hight from the beam so I've used a couple of bits of wood here as I couldn't find any 4 x 3 timber which would have been the perfect height (so 4x2 and 4x1 it was). Will see if BC say anything when they come round.

Screenshot 2025-09-14 at 22.45.24.png


I was dreading doing the rafters as I've never done all the cuts for the birdmouths, etc before so I bought an extra 6 lengths of timber as templates/ones to ruin if it came to it. I went with 7x2 C24 for the rafters, which at 4.2m long we're particularly cheap so I wanted to be careful.

I spent about 4 hours getting the first template for both sides sorted to a point I was happy with it, and used 4 of my 6 spares :) The cuts were a bit complicated (by me) having put full sized blocks on the outer skin so there was extra notching to do to accomodate those.

As my building isn't 100% square/level I would use each timer as the template for the next, then fit the earlier timber and then adjust the next timber if the angles/notches were getting out of step. Bit of a long winded process, but necessary because of my lack of building precision. However once I got into a rhythm it wasn't too bad.

Screenshot 2025-09-14 at 22.45.47.png


Bolted together at the top as per the plans. I've also nailed the rafters down, but will look to find a suitable joist/rafter bracket for extra hold.

Screenshot 2025-09-14 at 22.45.56.png


I ended up getting all the central rafters up in a day, and cut the overhangs off to facia width. However, I was then defeated by the wind and rain. After that it'll be the gable ladders and then filling in the brickwork.

Screenshot 2025-09-14 at 22.46.21.png


Starting to feel like a real building now!

In terms of costs, the steels were £1,100, timber was £850, genie hire was £150. Think I largely had the screws, nails, bolts for the fixings etc. So total garage spend £26k ish and total overall spend £145k. Not really going to be a cheap garage by the time I'm finished, but I'm getting what I want overall, so can't complain.

Cheers for reading :)
 
Hey all,

Time for another short update. Not too much been going on with the garage build to be honest, as weekends have been taken up with quite a few social things or weekends away.

Finishing off the gable walls was always going to be a bit of a pig with all the cuts around the gable ladder that need to be accounted for. I think it actually took me two whole weekends to get those done even though it was probably only about 80 blocks in total (whole and cut) to be laid.

In October the weather isn't your friend and also the lack of a scaffold made getting to a decent height to not be laying above your waist was impossible - leading to some sketchy step and step-ladder (on top of trestled boards) laying.

Then came the part I was looking forward to - actually getting the building to be covered (not water-tight as I didn't have doors etc), but getting the timber work and the cavities covered was long overdue.

Gotta love a hiab truck and a skilled driver who can plonk your stuff exactly where you need it :)
IMG_7029.JPG


I faffed for most of an afternoon getting the soffit strips fitted correctly (I was adjusting so I could lay whole tiles across the roof - with no cuts). Then I was getting the eaves trays on. One that was done I thought was plenty of time to get the membrane on the roof before dark with some temporary battening.

The from side was done first - managed to get this arty picture with the geese that always stop over in Hightown on their migration route... light already going!

IMG_7103.JPG


I guess you can see that I underestimated the time it would take to do the membranes as it was nighttime I'd finished the rear side! You can also see how wet some of the walls had been getting without having a proper covering for a couple of months.

Screenshot 2025-12-11 at 23.41.06.png


Fast-forward to the following weekend and storm Bram had blown a lot of the above back of the roof (great timing), so I started again and this time battened it properly - ready to accept the tiles later.

I had issues with the extension that the battens were wavy after my first fitting -so I took a lot of time to get the top and bottom batten straight using string lines, and then cut a length of batten to the right spacing for each row, and then made sure that every single point was measured using that cut length before nailing - its amazing how unstraight these battens are - so don't trust them!

Also you can start to see the fixings for the dry ridge at the top.

Screenshot 2025-12-11 at 23.49.10.png


The following week the fun job was loading out the roof - no conveyor belt to do it this time. Each side needed 220 tiles, so it was a matter of getting them onto the staging board. Then piling them on top of the bottom of the roof. Then getting them up to the top corner of the roof (but out to the ways so to not interfere the the laying)... that bit didn't work well with the restricted space so I move some of the tile more than once!

Each of the eaves row tiles on these Marley Wessex tiles has a special clip that holds the tile and blocks insects, etc getting into the roof through the tile ridge, and then every other tile has a 'solo' clip which is hammered into the batten below to hold the tile in place...which adds to the laying time. However, making progress....

IMG_7220.jpg

Rear side I managed to get done in a day:
IMG_7222.JPG


As you can see from the above, the weather was quite kind for a Saturday in mid-November, and I knew the next day's weather was not good so by head torch I did most the load out onto the front that night too. 400+ tiles lifted that day and 220 fitted... my back was killing by the end of it :D

IMG_7225.JPG


The next day was frigging horrible weather wise, raining constantly and gusts of wind sufficient to make you wobble on the roof. Of course, by the time I stopped to take a picture it was all blue skies and chirping birds!!

IMG_7230.JPG


Need to wait for a dry day for the ridge as it requires a membrane to be stuck to the tiles before the ridge is fitted. After that soffits, facias and gutters to be fitted. Hope to do those before Xmas as the doors, etc arrive soon after that. Hopefully a more substantial update to follow soonish!

Cost wise - the roofing stuff was £2,200. So total garage spend £28k ish and total overall spend £147k.
 
Last edited:

If you need to find a tradesperson to get your job done, please try our local search below, or if you are doing it yourself you can find suppliers local to you.

Select the supplier or trade you require, enter your location to begin your search.


Are you a trade or supplier? You can create your listing free at DIYnot Local

 
Back
Top