Slow overflow of water from toilet cistern to bowl

Joined
29 Mar 2014
Messages
26
Reaction score
1
Location
Pembrokeshire
Country
United Kingdom
The toilet in our bathroom is about five years old. Over the past few weeks it has developed a fault so that after flushing the water continues to run into the bowl. It does eventually stop, but it takes a while and it seems to be taking longer and longer.

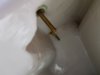
Taking off the cistern lid I can see the place where the flush button contacts on the left, an open-topped pipe, which presumably is the overflow, because water is draining into it, and a "tower" on the right.

20200404_143652-25%.jpg


Logically, if the water is overflowing, that suggests there is a problem with the water inflow valve, but this is a modern (and apparently cheapo) setup that doesn't have the traditional ballcock valve of an older cistern, so I'm at a bit of a loss where to start.

If I can find out where the valve is, and it's just a matter of replacing on O-ring, or even the whole valve (Fluidmaster products seem to have a good rep in this forum) then I'd like to try that. Now, I'm a believer in experimenting to find out how things work, but not if it ends up with me flooding the bathroom and half-destroying the upstairs loo, especially right now in the middle of the coronavirus lockdown when calling in a plumber might be difficult.

So if anybody has any pointers on the following I'd be really grateful.
1) How to drain the tank so I can work in the dry - can't see a stopcock anywhere.
2) Where the input valve is - maybe the structure on the right of the photo?
3) What to check for.

Got more photos if you need them.
Thanks!
 
Sponsored Links
It's times like this I just replace the flushing mechanism and inlet. Believe you me, it saves a load of time and cost.
Quite happy to do that too, if it looks easier. I don't want to spend 5 hours trying to save 5 quid - sooner just do it quickly and properly. Problem is knowing where to start!
 
Sponsored Links
In the short term you just need to figure out how to adjust the right hand fill valve float so it closes the valve sooner. It won't be difficult, there will be a rod or similar that the float runs on/pushes that then shuts the valve, this will be adjusted down so it's closes the valve earlier.
 
So if anybody has any pointers on the following I'd be really grateful.
1) How to drain the tank so I can work in the dry - can't see a stopcock anywhere.
2) Where the input valve is - maybe the structure on the right of the photo?
3) What to check for.
Managed to find the stopcock and drain the cistern today. However, the only way to get the cistern off was to pull the entire toilet away from the wall, having first removed the screws at the top edge of the cistern holding it into the wall. In addition to those two screws, all that was holding it was the sealant around the base of the loo, which I cut through.

As a result of pulling it far enough away from the wall to access the screws holding the cistern to the bottom half of the toilet (wingnuts) I had to pull the soil pipe away from its fastening. Nothing is damaged as far as I can see, so I guess the soil pipe is just a friction fit.

What I am worried about now is a kind of stopper that was inserted in the bottom of the cistern, a blanking plug maybe? It seems to be made of plastic, but the head had just crumbled away, so when I gave it a poke there was nothing holding it in and it just fell out the bottom of the cistern.

plug.png


Lucky I didn't do that when the cistern is full. Poor quality part. So now I'm looking for a replacement, will probably try this Flomasta one. It says 1/2" but one of the comments gives the size as 18mm, so that might work.

On the positive side, the Fluidmaster parts all look like they will fit.

Still a bit disappointed by the general cheapness and poor accessibility of the toilet though. Would quite like to replace the whole thing with a retro-style unit that doesn't try to cram everything into the smallest possible space.
 
Did you buy the parts before you pulled the toilet out or do you still have to buy them?

Andy
 
Thanks to the advice received here I have the Fluidmaster fill and flush valves installed. They seem to work fine, though getting the water threaded properly onto the fill valve with my left hand while lying on my back was a real sod.

However, the cistern is bolted on to the lower part using wingnuts on two long screws that lead to bolt heads inside the cistern (you can see them in the picture at the top). When I replaced the cistern and turned the water on to half-fill the cistern, I noticed that water was dripping from the ends of the screws. When I tightened these up with the washer and wingnuts, the drip turned to a weep, then stopped.

Seems obvious enough - pressure has been put on washer under bolt head in cistern, so water is no longer seeping through under bolt head - but it seems a bit of a ropey setup. Should I replace these two screws and their washers, or just let sleeping dogs lie? And if I do replace them, what are they called? Cistern screws?

EDIT: Or just put a blob of sealant around the wingnut/washer?
 

Attachments

  • 20200420_152135-25%.jpg
    20200420_152135-25%.jpg
    124 KB · Views: 276
Last edited:

DIYnot Local

Staff member

If you need to find a tradesperson to get your job done, please try our local search below, or if you are doing it yourself you can find suppliers local to you.

Select the supplier or trade you require, enter your location to begin your search.


Are you a trade or supplier? You can create your listing free at DIYnot Local

 
Sponsored Links
Back
Top