Drilled into cable - repair advice

Joined
10 Apr 2016
Messages
20
Reaction score
0
Country
United Kingdom
During kitchen replacement I've accidentally drilled into a ring main cable (stupid mistake!!). The cable is buried in a very solid external wall so pulling it out and replacing with new cable is not a viable option.

I plan to repair it by re-routing the cable to an adjacent spur and incorporating it into the ring (see green lines in diagram below). Then the current ring socket would become the spur. The existing spur is on a plasterboard wall so would be much easier to chase new cables to/from. I'd cut the damaged cables then leave them buried dead in the wall.

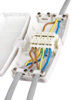
I am thinking of using one of these https://www.tlc-direct.co.uk/Products/ASJ803.html to join the cables. It will eventually be underneath a shallow kitchen cabinet. Not technically inaccessible but seems a compact solution for joining 4 cables.

My only concern is with the JB being at basically floor level (attached to the wall underneath the cabinet) in case of a water leak/flood. I am not aware of any regs on JB height so I might be overthinking this? If it is an issue I could put the JB closer to the previous socket, higher on the wall, but that would mean replacing more cabling (and it'd be behind a washing machine).

I know ideally I'd re-do the circuit with uninterrupted lengths of cable and not use a JB but as this socket is the last on the ring and it's a fair way back to the CU that won't be feasible either.

Can anyone suggest a better way of doing this or would this approach be OK?

Thanks!

Socket fix.png
 
Sponsored Links
The cable is buried in a very solid external wall

I bet it isn't.

It is very much more normal for a cable to be on the surface of the brickwork or concrete, and concealed with plaster or plasterboard, neither of which is difficult to open up.

With a modest amount of luck it might be inside oval conduit, or capping, and it is possible to push a new cable a limited distance when making a repair.
 
What you propose to do looks fine.

The JB you have drawn would in fact be two JBs.

Of course, you may have only damaged one cable.
 
Sponsored Links
Surely you need Two j/bs. If you are connecting all 4 cables together in one J803 box, then that becomes the end of the Ring, therefore making your final socket a spur of a spur
 
That wouldn't matter if two x 2.5mm² cables are connecting the now first socket on the spur, or
just use 4mm².

If only one cable is damaged then you only need reroute that one cable.


It is pointless having a ring circuit in the configuration drawn.
 
Appreciate it would be two Jb’s If using the standard round kind but given that the J803 has 3x4 terminals, could it not be used for connecting all 4 cables in a single box? As per this image but with the fourth cable entry also used.
 

Attachments

  • E8F69D48-BDDA-4170-AA53-166BC15688FE.jpeg
    E8F69D48-BDDA-4170-AA53-166BC15688FE.jpeg
    439.6 KB · Views: 317
Why is a J803 any different than a Round J/B, either type they would connect all 4 cores together, thus terminating the ring, from there on, for supplying your two accessories, the cabling needs increasing to 4mm, Or is that why you have drawn 2 cables exiting the J/B, though 2 x 2.5mm Parallel conductor wiring is not the Norm in domestic wiring.
 
Have any of you actually looked at or used the jb he proposes to use because that is what it is designed for extending a ring final circuit one leg on left side joined through one leg on right side joined through keep up with the new products people
 
Have any of you actually looked at or used the jb he proposes to use because that is what it is designed for extending a ring final circuit one leg on left side joined through one leg on right side joined through keep up with the new products people
Are you talking about the J803? If so, it doesn't work as you have described - it is functionally like any other 3-terminal JB, with the capacity to have four conductors connected together in each of the three 'terminals' - but that's all.

Kind Regards, John
 
Have any of you actually looked at or used the jb he proposes to use because that is what it is designed for extending a ring final circuit one leg on left side joined through one leg on right side joined through keep up with the new products people
If you look the OP is proposing to put BOTH legs through it and if you look at the JB the terminals are marked L,N and E with 4 inlets/outlets for each
 
If you look the OP is proposing to put BOTH legs through it and if you look at the JB the terminals are marked L,N and E with 4 inlets/outlets for each
Indeed. I think that those who tell us to "keep up with the new products" would probably do well to first attend to their own 'keeping up' :)

Kind Regards, John
 
Indeed. I think that those who tell us to "keep up with the new products" would probably do well to first attend to their own 'keeping up' :)

Kind Regards, John
Also a bit worrying from a poster that regularly, states to posters to get a "Sparky" and about Testing and Certification, if he has been fitting Hagar boxes in the way he suggests.
Though I think you can get similar connectors now with single straight thru connecters.
 
Thanks for all the comments. It was my understanding that each pair of terminals (one in one out) on the J803 was independent so was intending to use it to connect the 4 x 2.5mm in pairs, I.e connect the two legs of the ring separately to keep the circuit as a ring. If this JB in fact doesn’t work like that and ALL conductors inserted into the 4 live terminals are connected as one then I see this would terminate the ring which is not what I want to do.

If that’s the case I will use two standard JBs further back on the ring where they can be better positioned.
 

DIYnot Local

Staff member

If you need to find a tradesperson to get your job done, please try our local search below, or if you are doing it yourself you can find suppliers local to you.

Select the supplier or trade you require, enter your location to begin your search.


Are you a trade or supplier? You can create your listing free at DIYnot Local

 
Sponsored Links
Back
Top