Attic door face pushing against frame and won't close

Joined
15 Dec 2025
Messages
3
Reaction score
0
Country
Ireland
Hi there
We recently got our attic converted and it has a custom door at entry and it closed fine up until we got it painted. It doesn't look like the painter took the door off to paint the trim and door.
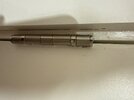
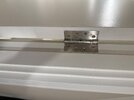
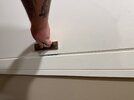
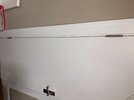
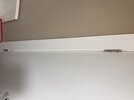
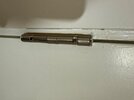
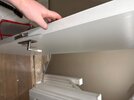
The door now won't close, when you try to close it the hinges start pulling away from the frame and on closer inspection I can see that the face of the door around the frame is pushing into the frame which is why I can't close it. ChatGPT is recommending I cutout the door side hinge to allow it to sit deeper into the door but it's ChatGPT and I don't want to go ruining a door if that's not going to solve the issue. Any recommendations? I've guests staying this weekend and would like the door to be able to close for them
 

Attachments

  • IMG_B262EADA-16FD-41F1-B848-7F5C1BB199D3.jpeg
    IMG_B262EADA-16FD-41F1-B848-7F5C1BB199D3.jpeg
    230.3 KB · Views: 26
  • IMG_DD004A6E-E8AD-452E-8254-79F979B757B6.jpeg
    IMG_DD004A6E-E8AD-452E-8254-79F979B757B6.jpeg
    167.7 KB · Views: 25
  • IMG_462527F1-01F6-483E-9E2A-CE98FB19D795.jpeg
    IMG_462527F1-01F6-483E-9E2A-CE98FB19D795.jpeg
    156.2 KB · Views: 23
  • IMG_D23D37BC-2FD5-42A8-B6BB-07B38DA784FE.jpeg
    IMG_D23D37BC-2FD5-42A8-B6BB-07B38DA784FE.jpeg
    96.6 KB · Views: 24
  • IMG_B803E131-E864-4DB4-A4BE-974D8411A1A3.jpeg
    IMG_B803E131-E864-4DB4-A4BE-974D8411A1A3.jpeg
    87.5 KB · Views: 26
  • IMG_8EEE2D6E-C8F8-44D7-AADD-9C31977B64E6.jpeg
    IMG_8EEE2D6E-C8F8-44D7-AADD-9C31977B64E6.jpeg
    244.7 KB · Views: 25
  • IMG_F6AD5E19-37F4-470B-9596-0082D0DA2986.jpeg
    IMG_F6AD5E19-37F4-470B-9596-0082D0DA2986.jpeg
    143.1 KB · Views: 26
It's not clear from your description where it is catching. Is it on the hinge side or the latch side?
 
If the door stop (the strip of timber on the lining) is detachable - which it looks like it is, you can lever it off and refix it a couple of mm off the door. That's the least disruptive and easier option, and the correct one.

You don't really want to move the door outwards and re-set the hinges, so the other alternative would be to chamfer or sand the door edge where is catching the stop. This is more difficult and can look a right mess if you do it unevenly.

Or
 
Thanks woody...will try that. I wonder if that door, given it's kind of custom to fit the attic shape, is made of mdf and the painter didn't prep it and the mdf just sucked up all the paint and expanded causing this issue. Door closed perfectly fine before painting
 
It looks like a hardwood skin door rather than MDF. You can see the timber edging.

I see nothing that suggests that the decorator is at fault. That said, check the door stops to make sure that there isn't a massive build up of paint where the paint runs around and back to the frame. If there is, you can use a sharp chisel and sandpaper to remove the excess.

Your decorator seems to have used a roller to apply most of the paint. TBH, the finish is a bit pants. The roller might have built up paint at the edge of the door stop.

I am a decorator but often hang doors.

I am inclined to think that the chippie didn't leave enough space where the doorstop meets the hinge side of the door.

I agree with @^woody^ that removing the door stop and moving it by 2mm or so would be the path of least resistance. You will need to cut through the existing paint line to reduce paint chipping. It will be more disruptive than moving the hinge, but, arguably, easier than plugging the screw holes in the hinges.
 
I don't understand why the pictures show a silver hinge with a zig zag screw pattern and the video shows a black hinge with a U pattern

Have the hinges been changed?

The fastest solve for this would be to drill a new set of holes in one hinge leaf (I'd do the leaf that attaches to the door frame), using eg a 4 mm bit for the hole then an 8 to chamfer the hole edges so a countersink screw sits in it nicely

This means the door can be re mounted so the hinge screws are driven into into fresh wood in the frame. Mount the hinge so that it isn't where is was; it needs to be a few mm further away from the stop the door is rubbing on, so there is a small gap like this where the hinge sits in the frame (blue arrow)


1766219066821.png


Whether the sight of empty screw holes in the hinge offends you or not dictates how far you'll go in terms of filling and painting them


-

If the hinge is different in video vs picture because one hinge is silver and the other is black and the screw hole patterns differ it may help you actually, because you can swap the hinges over top to bottom and the different holing patterns means you have a better chance of getting them all into fresh wood. If any hinge screw holes so-so line up with old screw holes, pre drill a little way and drive the screw in at a slight angle so it doesn't just pull straight back into its old hole and mess up the hinge alignment

-

The solutions the others are talking about are arguably better but longer and messier

Drive a wood chisel into this joint, at the very bottom of the door case:

1766219734725.png


Drive it in like this (top down view) a little way:
1766220506289.png


And lever it gently and see if the entire strip of wood looks like it will lever off the frame

If you think it will, cut down the entire joint with a Stanley knife both sides then carefully prise the wood off the frame, do the same with the top one, then close the door and remount the wood so it's juuust not quite touching the door, nail it and then fill and paint

-

If that strip of wood won't come off/is a part of the frame and you don't want to move the door on its hinges you'll need to cut some off that strip. This is hard. For newbies the easiest method would broadly be to make a guide block that you run a multitool up against, but a better result would be delivered by a router. I think it unlikely you have a router and that's the point it may be worth calling a chippy in and giving them some pound notes, unless you're the sort that likes an approach of "I could give a guy a hundred quid.. or I could put a hundred quid towards a router.." (though you'd have to put slightly more than that.. a decent cordless one, plus some good chisels, would demolish this)

All that router stuff said, a multitool would orobably be a better purchase / you'll get more use out of one
 
Last edited:

If you need to find a tradesperson to get your job done, please try our local search below, or if you are doing it yourself you can find suppliers local to you.

Select the supplier or trade you require, enter your location to begin your search.


Are you a trade or supplier? You can create your listing free at DIYnot Local

 
Back
Top