Bath / Shower silicone questions

Joined
7 Apr 2015
Messages
44
Reaction score
2
Location
London
Country
United Kingdom
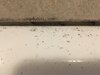
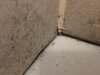
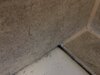
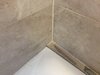
About a year into a new bathroom, the silicone started peeling away from the bath and getting mouldy. It gradually detached along most of the length of the bath.
I've put this off for a while but now decided to try and tackle this myself.

The bath is Carronite (acrylic) so I wondered if maybe the bond wasn't strong enough, or maybe they used cheap silicone. Or there might be too much movement when the bath is full.

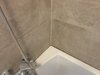
The builders used 2 different colours of silicone to match both bath and tiles.
Now that I've removed the offending white silicone I'm wondering if I will be able to just replace the white up to the edge of the beige, or will it not form a proper seal if I do that?
Do I need to replace all of it and do it in one go?

To confirm the acrylic bath adhesion I asked Carron what they recommend, which is Unibond kitchen & bathroom anti-mould.
I asked Unibond if their triple protect mould resistant product would have the same adhesion and they said yes. I've bought some of that in white, but now realised I may need to redo everything, and it may as well be in grey along the bath as well.

Before I do anything I plan to lightly abrade the bath surface where the silicone will go, and then use white spirit to clean, mask off with tape and use a shaping tool.
I will also fill the bath with cool water and stand in it while I'm working.

I haven't done this before, and after a couple of hours removing old caulk (which very stubbornly stuck to the underside of the tiles and further down the gap) I don't want to mess it up and have to do it again.

Is there anything else I need to consider?
 

Attachments

  • IMG_2185.JPG
    IMG_2185.JPG
    185.3 KB · Views: 90
  • IMG_2186.JPG
    IMG_2186.JPG
    235.8 KB · Views: 86
  • IMG_2187.JPG
    IMG_2187.JPG
    187.8 KB · Views: 81
  • IMG_2188.JPG
    IMG_2188.JPG
    247.3 KB · Views: 86
  • IMG_2189.JPG
    IMG_2189.JPG
    280.4 KB · Views: 96
  • IMG_2190.JPG
    IMG_2190.JPG
    270 KB · Views: 104
Sponsored Links
It’ll be fine butting up to the beige. I would check the bath feet are fully tight, otherwise it may crack a short time after doing the work.
 
If you abrade it and go beyond where the silicone will be it could make it easier for mould to get a hold so I wouldn't, finish clean up with silicone remover and a final rub with meths until it squeaks.
A well installed Carronite bath shouldn't move .
 
Thanks, the bath panel is caulked as well, so it's not easy to check the feet.
I think the movement may have been something 'settling' as I don't see much movement when standing in the bath.

I will avoid abrading

Whether the bath is well installed - who knows?

I really hope the new & different silicone will bond to the old one..!

I will make the bead slightly wider, so it should handle any flex a bit better and form a stronger bond.
I've seen someone recommend 'low modulus' (more flex) for baths, but others say all the anti-mould stuff is always high modulus.
Also Dowsil 785N as a neutral reaction (less odour) being better at adhering to acrylic, but not as good anti-mould properties.

If only this stuff involved less guesswork ‍♂️
 
Sponsored Links
♂️
Ok, that does make sense. I have no idea what the beige silicone was. Maybe I can find out, but probably it's safer to just redo all of it.
This means returning the white Unibond and deciding on a new grey silicone that will match the tiles.
So, Dowsil 785+ or 785N?
Apparently the Unibond in grey is too dark to be a mid-grey.
 
What do you do to prevent mould?
Wipe down after every shower, regular spray with bleach / vinegar / borax?
I do have an extractor installed, so maybe there were spores there already.
Although I would have thought replastering before new fittings & tiles would have sorted that.
 
What do you do to prevent mould?
Wipe down after every shower, regular spray with bleach / vinegar / borax?
I do have an extractor installed, so maybe there were spores there already.
Although I would have thought replastering before new fittings & tiles would have sorted that.
Good inline extraction,Squeegy , microporus cloth and never dry towels or cloths in the rads.
We don't use any chemicals
 
Looking at this again, I measured and one of the tiles along the side of the bath has a 6-7mm gap at the largest point. The other tile's (there are 2 longways) gap is about 4mm.
The builders clearly didn't know how to cut large porcelain tiles, despite me explaining the requirement for a wet saw that the showroom advised me about.
I'm really annoyed seeing how badly they bodged this, especially considering how much it all cost. And it means each time I need to replace silicone, it's a real job getting all the old stuff out of those huge deep gaps, rather than a clean 2mm.

Along the top the gap is also about 4mm, but for some strange reason that edge has grout under the tile while the others do not.

Also, along the long side of the bath, the gap seems quite deep, and the surface behind is not flat. I'm wondering if it's worth filling this with something else first?

I considered trying to remove the bath panel (siliconed in on all sides) to try and raise the bath, but then realised the grout would have to come out and this would only allow me to raise it another 2mm. With a spirit level the runoff along the top edge looks about right, slightly sloping inwards so water doesn't run off the outside edge.
So that doesn't give much room for adjustment anyway.

The tile along the top edge is chipped on its face, so I will be needing at least a 10mm bead around the bath to cover all the gaps and jagged edges.
 
‘triple protect mould protection’ ?
seriously?
so the single protect and double protect were not good enough for unibond?
why didn’t they just jump to quadruple bond and anti mould and get it over with? :LOL:
 
Get a Karcher window vac to clean the tiles/shower screen.
 

DIYnot Local

Staff member

If you need to find a tradesperson to get your job done, please try our local search below, or if you are doing it yourself you can find suppliers local to you.

Select the supplier or trade you require, enter your location to begin your search.


Are you a trade or supplier? You can create your listing free at DIYnot Local

 
Sponsored Links
Back
Top