Best way to fill a crack in a table

Joined
10 Aug 2010
Messages
526
Reaction score
5
Location
Leicester
Country
United Kingdom
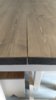
Looking at ideas in how to fill the crack in our table?

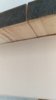
We've tried cramps but the top won't move at all

Wood filler? We're going to sand and revarnish the top afterwards but worried we'll be left with a noticeable line
 

Attachments

  • IMG-20190208-WA0000.jpeg
    IMG-20190208-WA0000.jpeg
    241.4 KB · Views: 331
  • IMG-20190208-WA0002.jpeg
    IMG-20190208-WA0002.jpeg
    197.8 KB · Views: 317
Sponsored Links
Unless you can close that gap there's sure to be a filler line visible.
Have you tried a proper sash cramp, after first releasing the top from the table frame?
If the gap will close, the join can be plated with steel from underneath after gluing.
If the gap won't close then its filler I'm afraid.
John :)
My brother in law who's a carpenter came over we unscrewed the top and with a home made cramp and some wooden wedges which he tightened, tapping the wedges with no luck.
 
Last edited:
Sponsored Links
Which would be best the aluminium sash cramps or the tbar ones?
 
Boards have cupped, they won't come back together. If you have access to a jointer, best to take them both off and re-joint. Could be achieved by planing them.
 
is that end nearer to a heat source like a radiator or cooker ??
if so try turning it round for a while to see what happens
 
is that end nearer to a heat source like a radiator or cooker ??
if so try turning it round for a while to see what happens
I'm not sure if it's been near any heat source as we picked it locally.

Boards have cupped, they won't come back together. If you have access to a jointer, best to take them both off and re-joint. Could be achieved by planing them.
Been told I can't take the top off as underneath is a separate piece?

IMG_20190209_210733.jpg
 
Undo those posidriv screws and the top will come off. Ideally the top should be allowed to float but that's rarely done these days.
If you want a perfect job the top can be sawn along the split line, the edges perfectly planed and grooved to accept a tongue or biscuit.....cramped together and glued the join will be hardly visible and ready for sanding.
If the middle was hollow planed, only one cramp would be necessary. That's how I was taught, many years ago!
John :)
 
Difficult to see the width of the gap but maybe pack and glue with hardwood slivers, then finished above and below with wax sticks like these:

https://www.toolstation.com/search?q=wax+sticks

Blup
These any better ?

IMG_20190209_213507.jpg
IMG_20190209_213530.jpg
MVIMG_20190209_213516.jpg


It seems to be bending upwards on the left corner

Undo those posidriv screws and the top will come off. Ideally the top should be allowed to float but that's rarely done these days.
If you want a perfect job the top can be sawn along the split line, the edges perfectly planed and grooved to accept a tongue or biscuit.....cramped together and glued the join will be hardly visible and ready for sanding.
If the middle was hollow planed, only one cramp would be necessary. That's how I was taught, many years ago!
John :)
Sounds expensive

I'll have a go at taking the top off in the morning.
 
Last edited:
if you got it like that very recently
try a fine spray underneath at the open end 2 or 3 time a day for a week
now nothing may happen right up to a good closure but if that end is drier and you fill it when the other end shrinks it may cause the other end to open
 
Tried cramping the top after I took the screws out but it wouldn't budge at all,in the end I filled it with wood filler

In the process of sanding it down now then staining hoping I can hide the faint line.
MVIMG_20190210_204918.jpg
IMG_20190210_204938.jpg
IMG-20190212-WA0000.jpeg
 
You need to take off the present fixings and refix the table top to the frame using 'buttons'. That will allow the top to remain as one piece but move with changes in temperature and humidity.
 
You need to take off the present fixings and refix the table top to the frame using 'buttons'. That will allow the top to remain as one piece but move with changes in temperature and humidity.
That's way out of my skill base.

Prob not going to help but Mrs wants the table Infront of a radiator
 

DIYnot Local

Staff member

If you need to find a tradesperson to get your job done, please try our local search below, or if you are doing it yourself you can find suppliers local to you.

Select the supplier or trade you require, enter your location to begin your search.


Are you a trade or supplier? You can create your listing free at DIYnot Local

 
Sponsored Links
Back
Top