My wife has decided we need a Kilner jar chandelier in our kitchen, something along the lines of this:

However, as we're looking at close to £1000 for a specialist company to put together an old cartwheel, eight earthed and hooked lampholders, a bit of chain, some old jam jars and some heat resistant flex which all in can be bought for around £50, I figured I should have a go at wiring the lampholders (like these) in parallel myself and get our electrician to test it before fitting it.

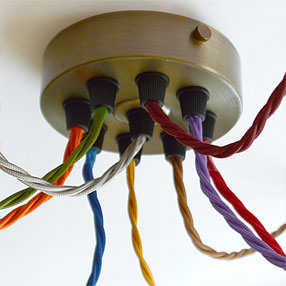
Trouble is the electrician says he's never seen anything like it (the chandelier) and wouldn't know where to begin wiring it up. In particular he wasn't sure how to get the eight cables, one from each lampholder, to join up in the wheel hub and go into the single cable which comes down from the ceiling.
So I would appreciate any link or advice on what sort of terminal block/choc block/junction box I would need to take a three core cable from the ceiling and distribute it to the eight lampholders, whilst meeting current UK lighting regs? And if I do wire it up, do any tests need to be done on it before the electrician can connect it up to the mains coming out the ceiling rose?
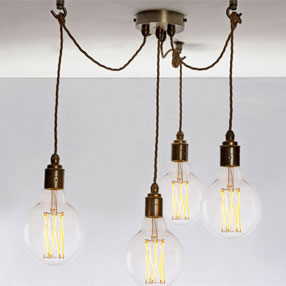
I am assuming that whatever the mass-produced chandelier below (as an example) has inside it would be what we would need, since it's operating on exactly the same principle, viz a single cable comes down from the ceiling rose into the body of the lamp, and is distributed in parallel to eight bulbs:

Or do I have to explain to my wife that we need to choose a different kind of light, or pay a grand to get someone else to make it for us?
Regarding the Kilners, I am aware of the need to drill ventilation holes in the tops, but as I only plan to use 4W LED bulbs they will be producing a negligible amount of heat regardless.
However, as we're looking at close to £1000 for a specialist company to put together an old cartwheel, eight earthed and hooked lampholders, a bit of chain, some old jam jars and some heat resistant flex which all in can be bought for around £50, I figured I should have a go at wiring the lampholders (like these) in parallel myself and get our electrician to test it before fitting it.
Trouble is the electrician says he's never seen anything like it (the chandelier) and wouldn't know where to begin wiring it up. In particular he wasn't sure how to get the eight cables, one from each lampholder, to join up in the wheel hub and go into the single cable which comes down from the ceiling.
So I would appreciate any link or advice on what sort of terminal block/choc block/junction box I would need to take a three core cable from the ceiling and distribute it to the eight lampholders, whilst meeting current UK lighting regs? And if I do wire it up, do any tests need to be done on it before the electrician can connect it up to the mains coming out the ceiling rose?
I am assuming that whatever the mass-produced chandelier below (as an example) has inside it would be what we would need, since it's operating on exactly the same principle, viz a single cable comes down from the ceiling rose into the body of the lamp, and is distributed in parallel to eight bulbs:
Or do I have to explain to my wife that we need to choose a different kind of light, or pay a grand to get someone else to make it for us?
Regarding the Kilners, I am aware of the need to drill ventilation holes in the tops, but as I only plan to use 4W LED bulbs they will be producing a negligible amount of heat regardless.