Drayton wiser install - hot water and wireless thermostat

Joined
21 Oct 2011
Messages
81
Reaction score
0
Location
Bristol
Country
United Kingdom
Sorry- yet another smart thermostat wiring question.

I want to install a Drayton Wiser two channel system. I currently have a Honeywell wireless thermostat (connects to a R6660D) controlling my central heating.

I have a Honeywell wired timer (ST9100c) controlling my hot water cylinder.

I have no idea how to wire these into the wiser back plate. I’m a competent DIYer but I’m not sure if this is beyond me (or even possible!). Here are photos of the current wiring-
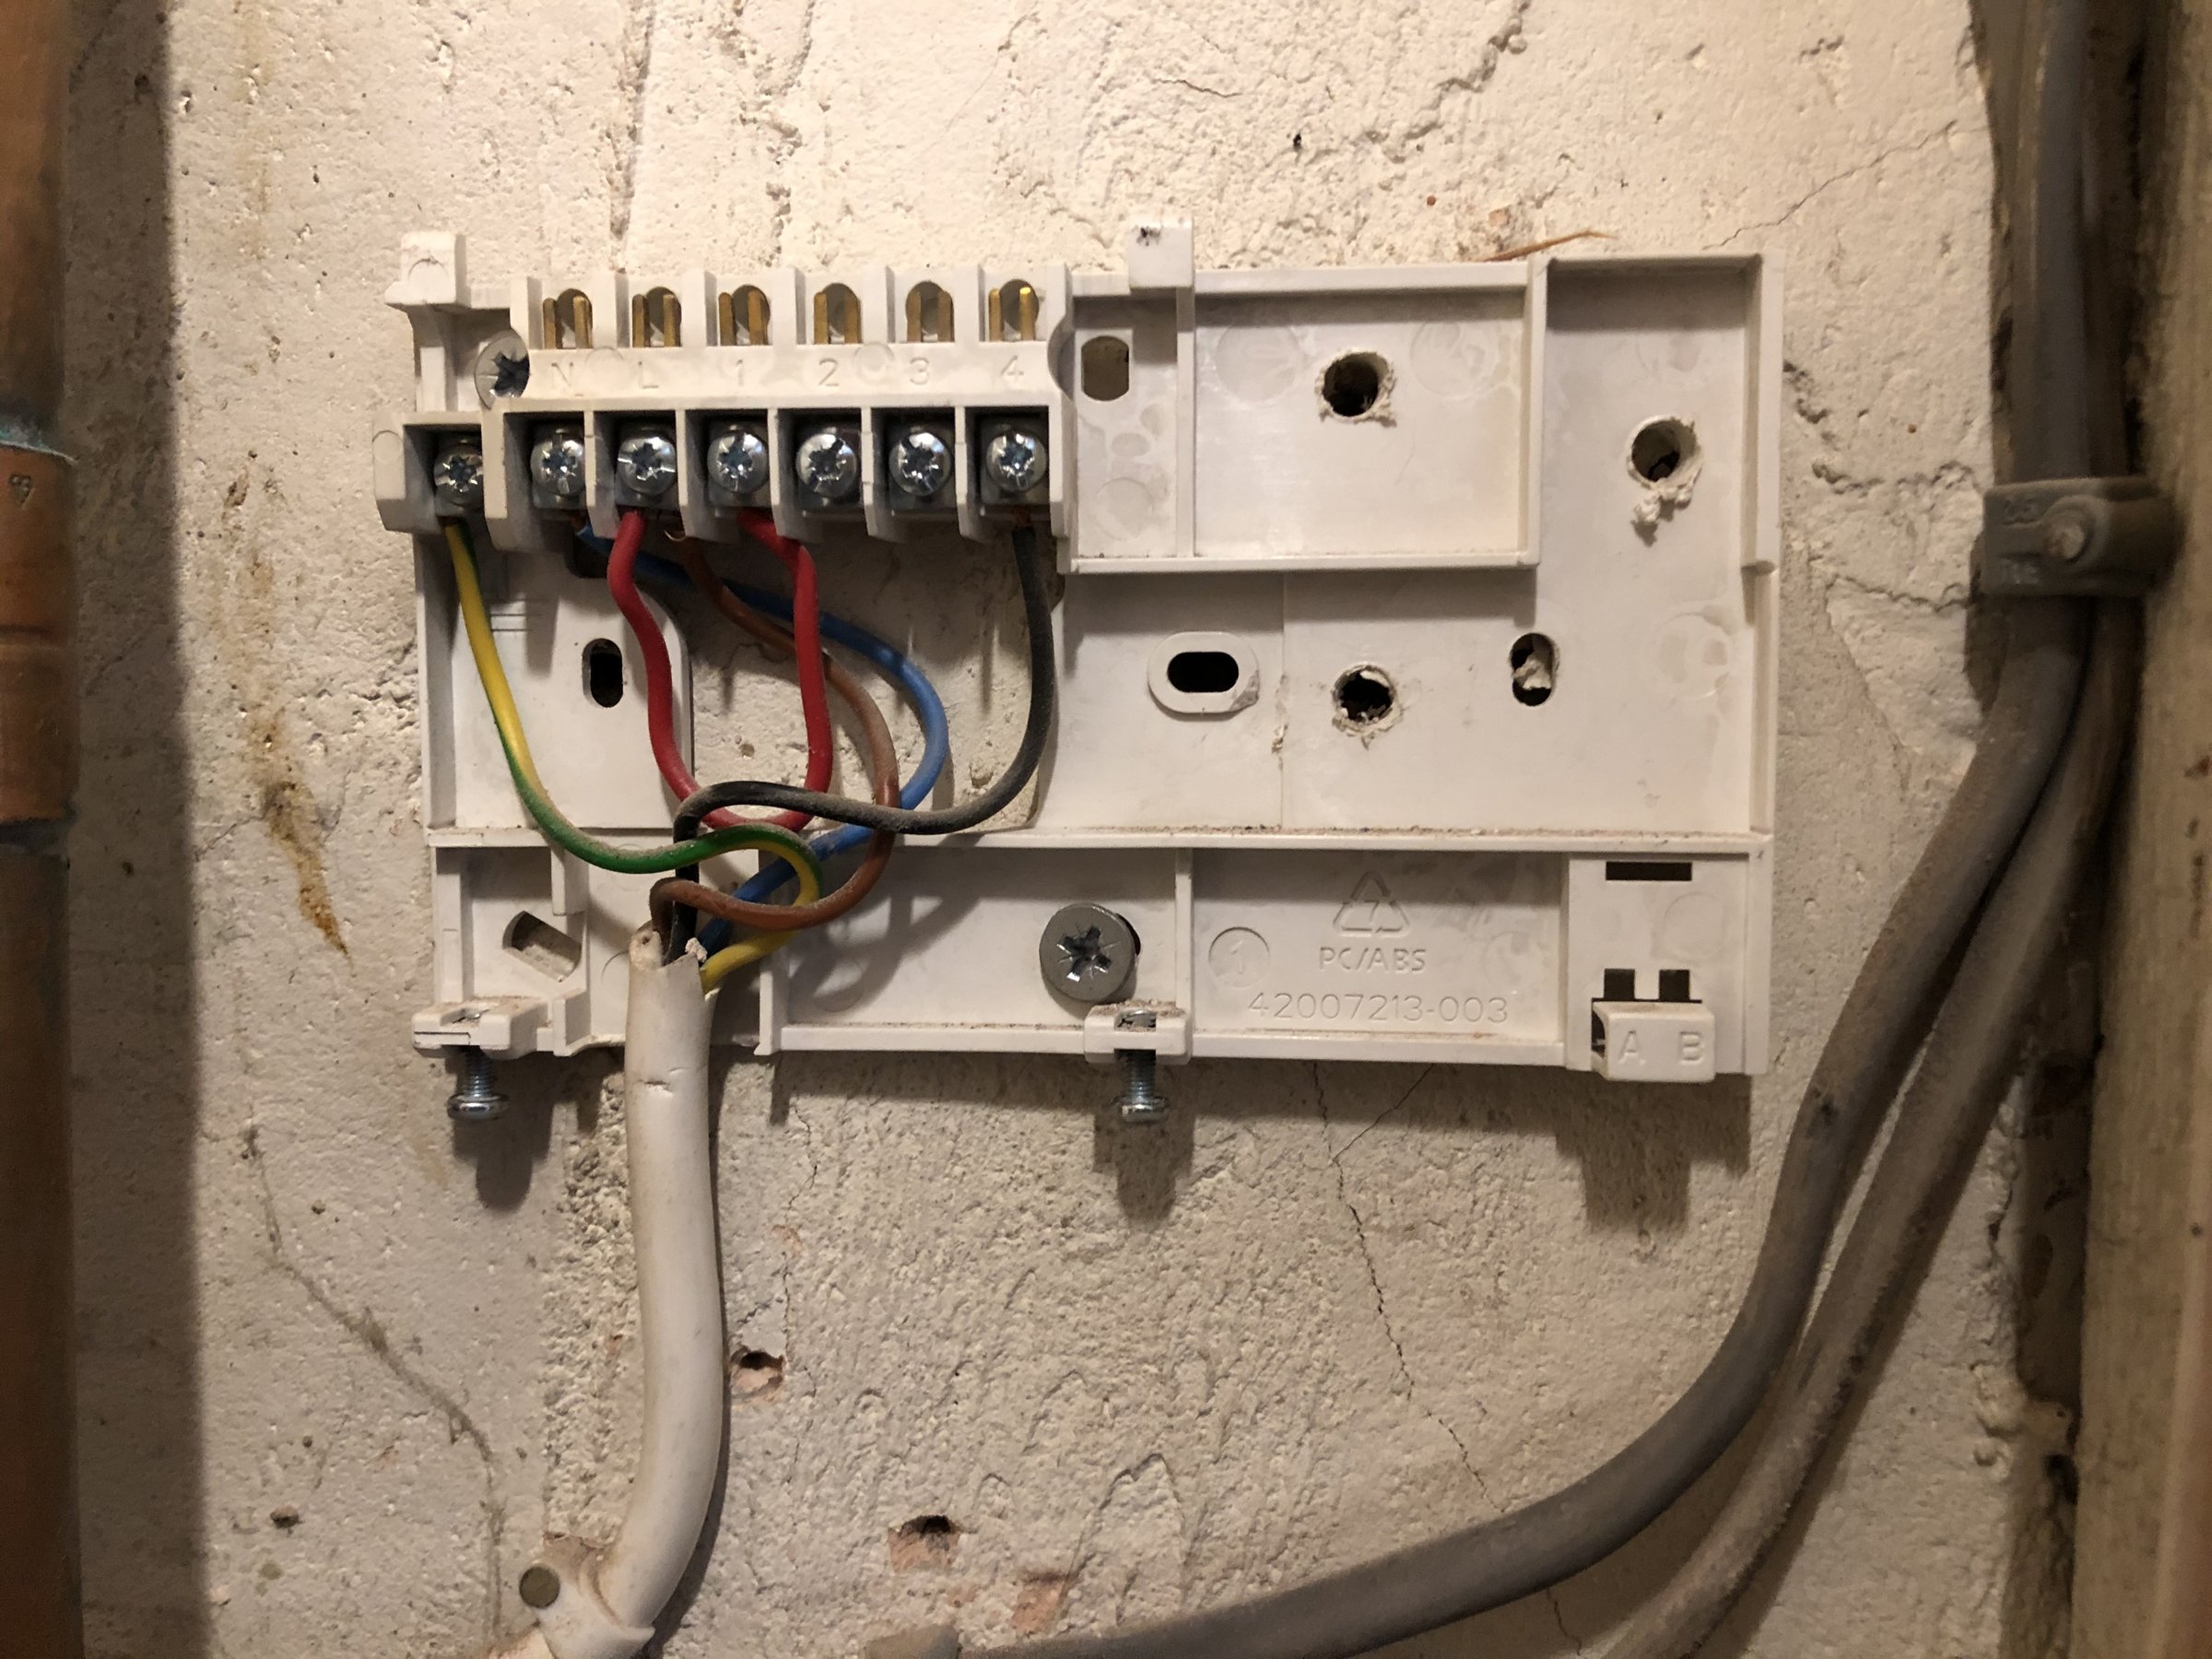
This is the hot water timer.


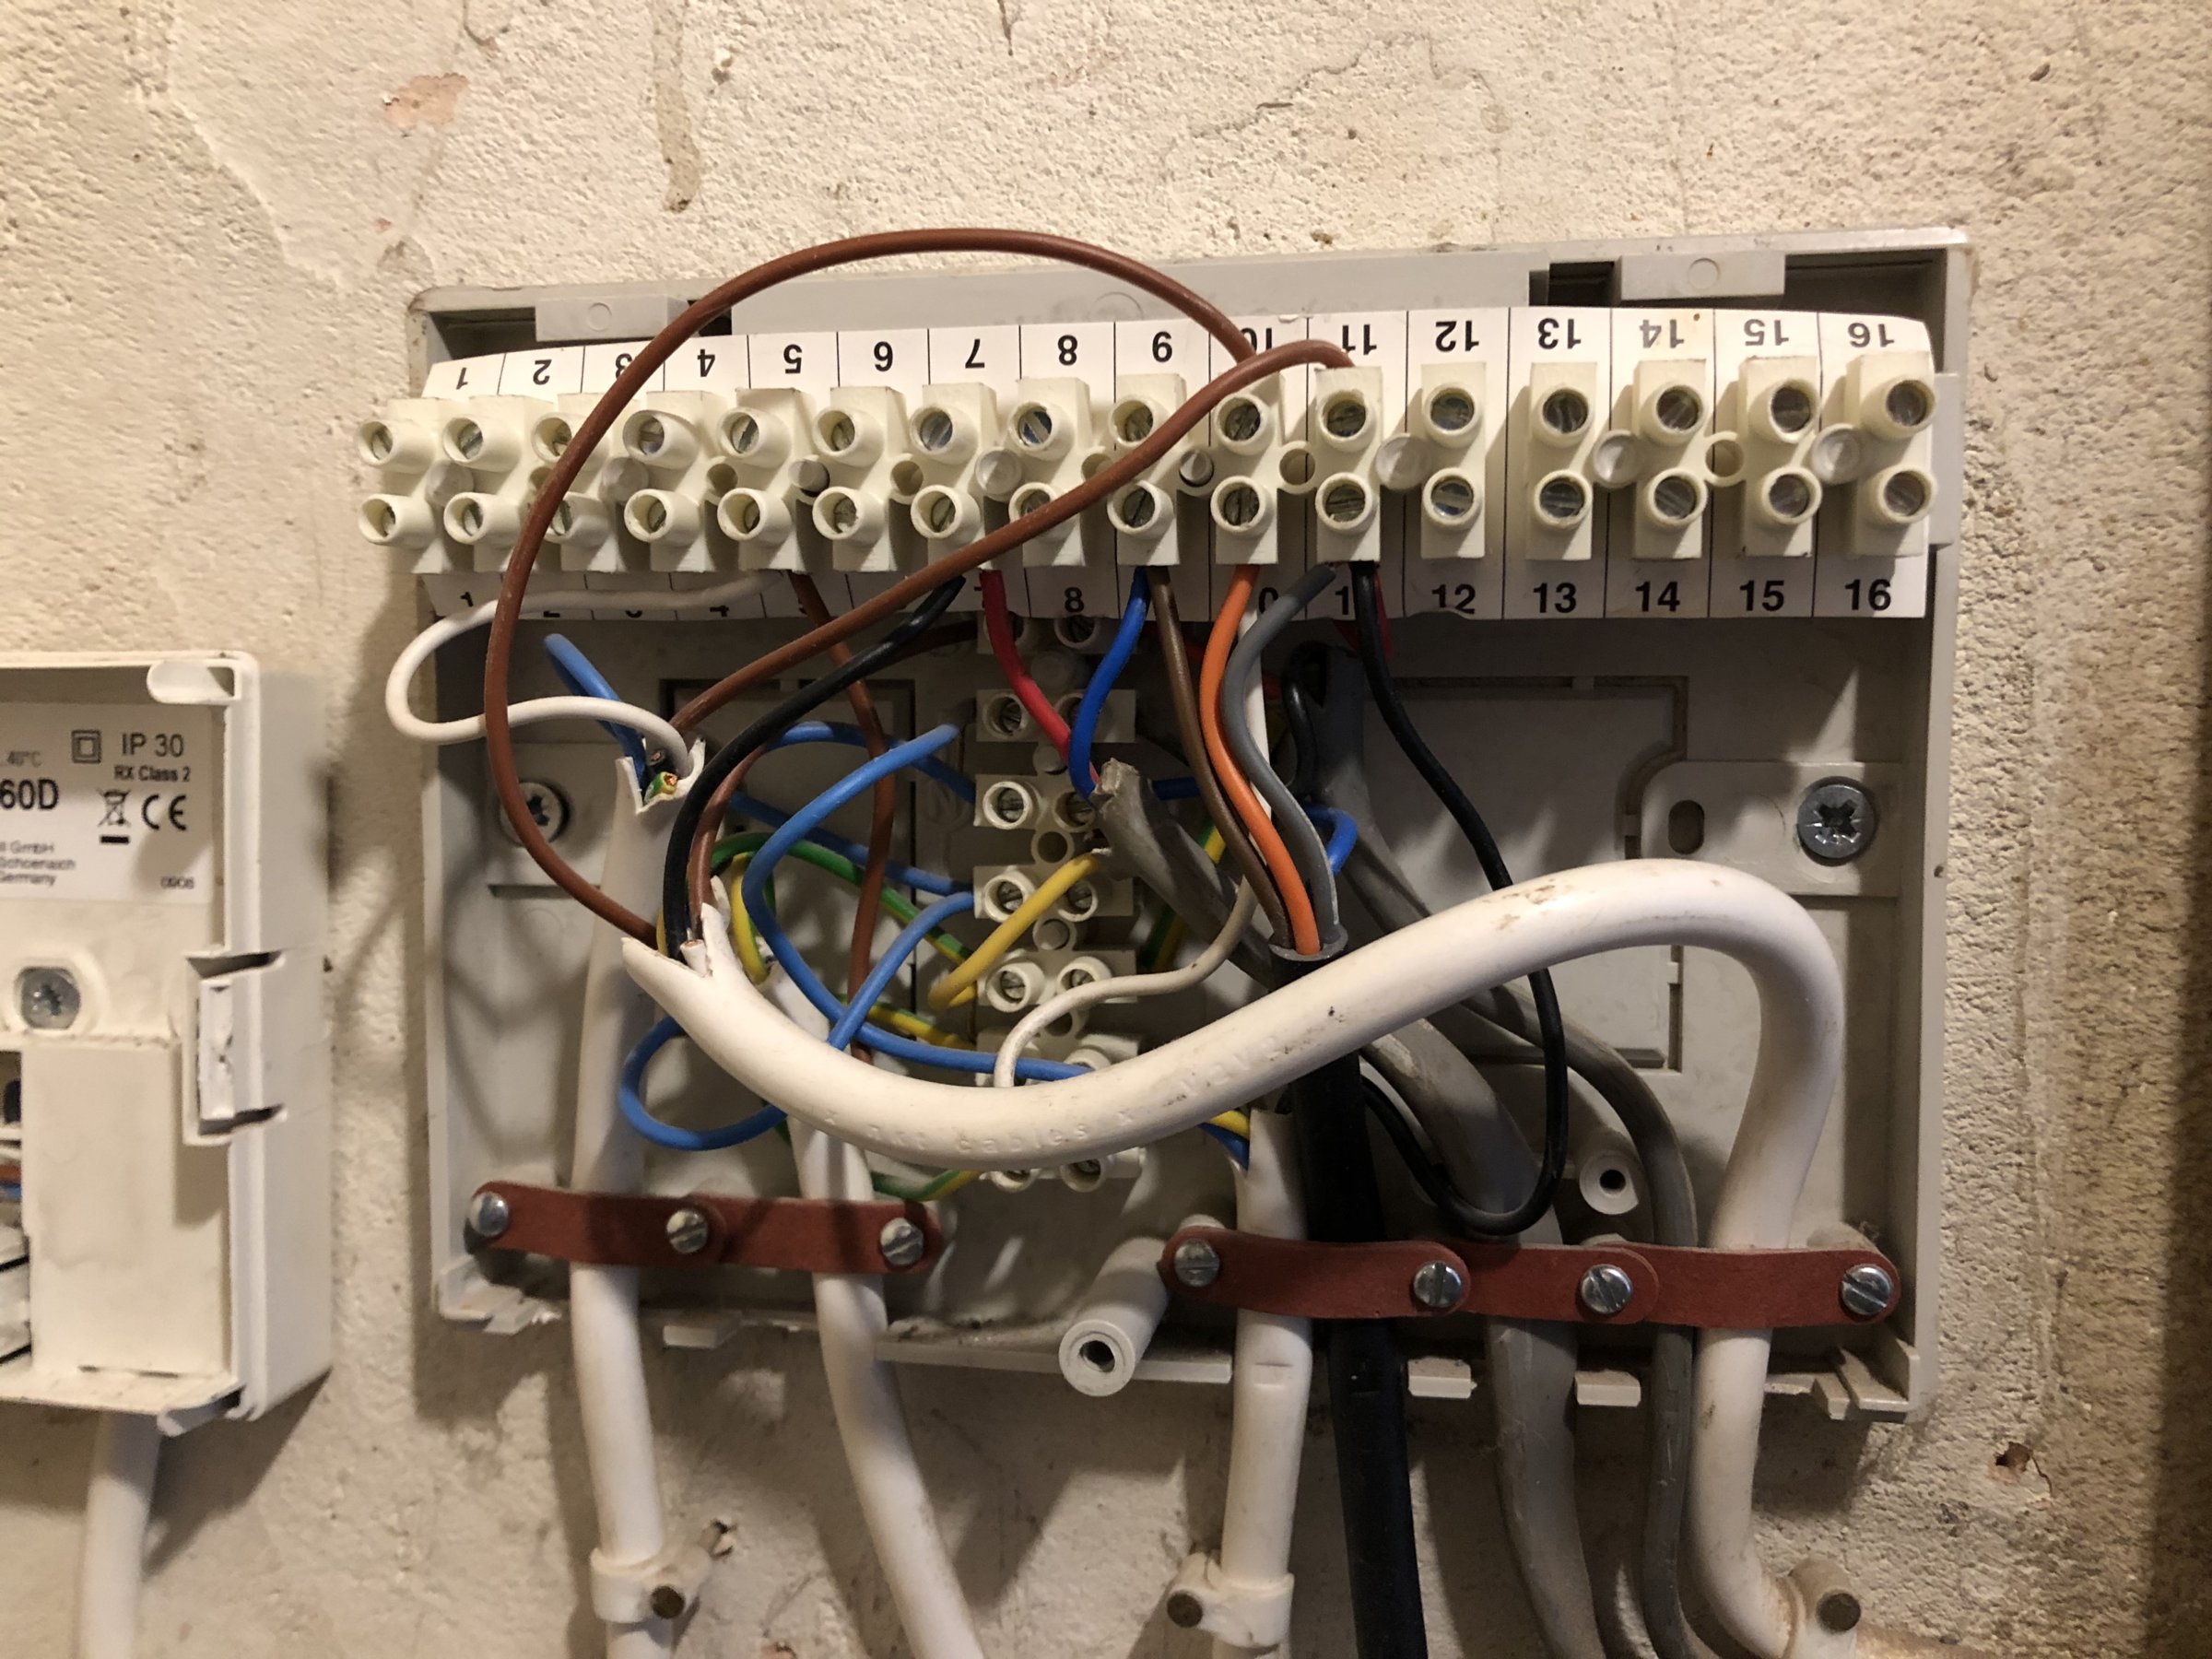
This is the junction box.


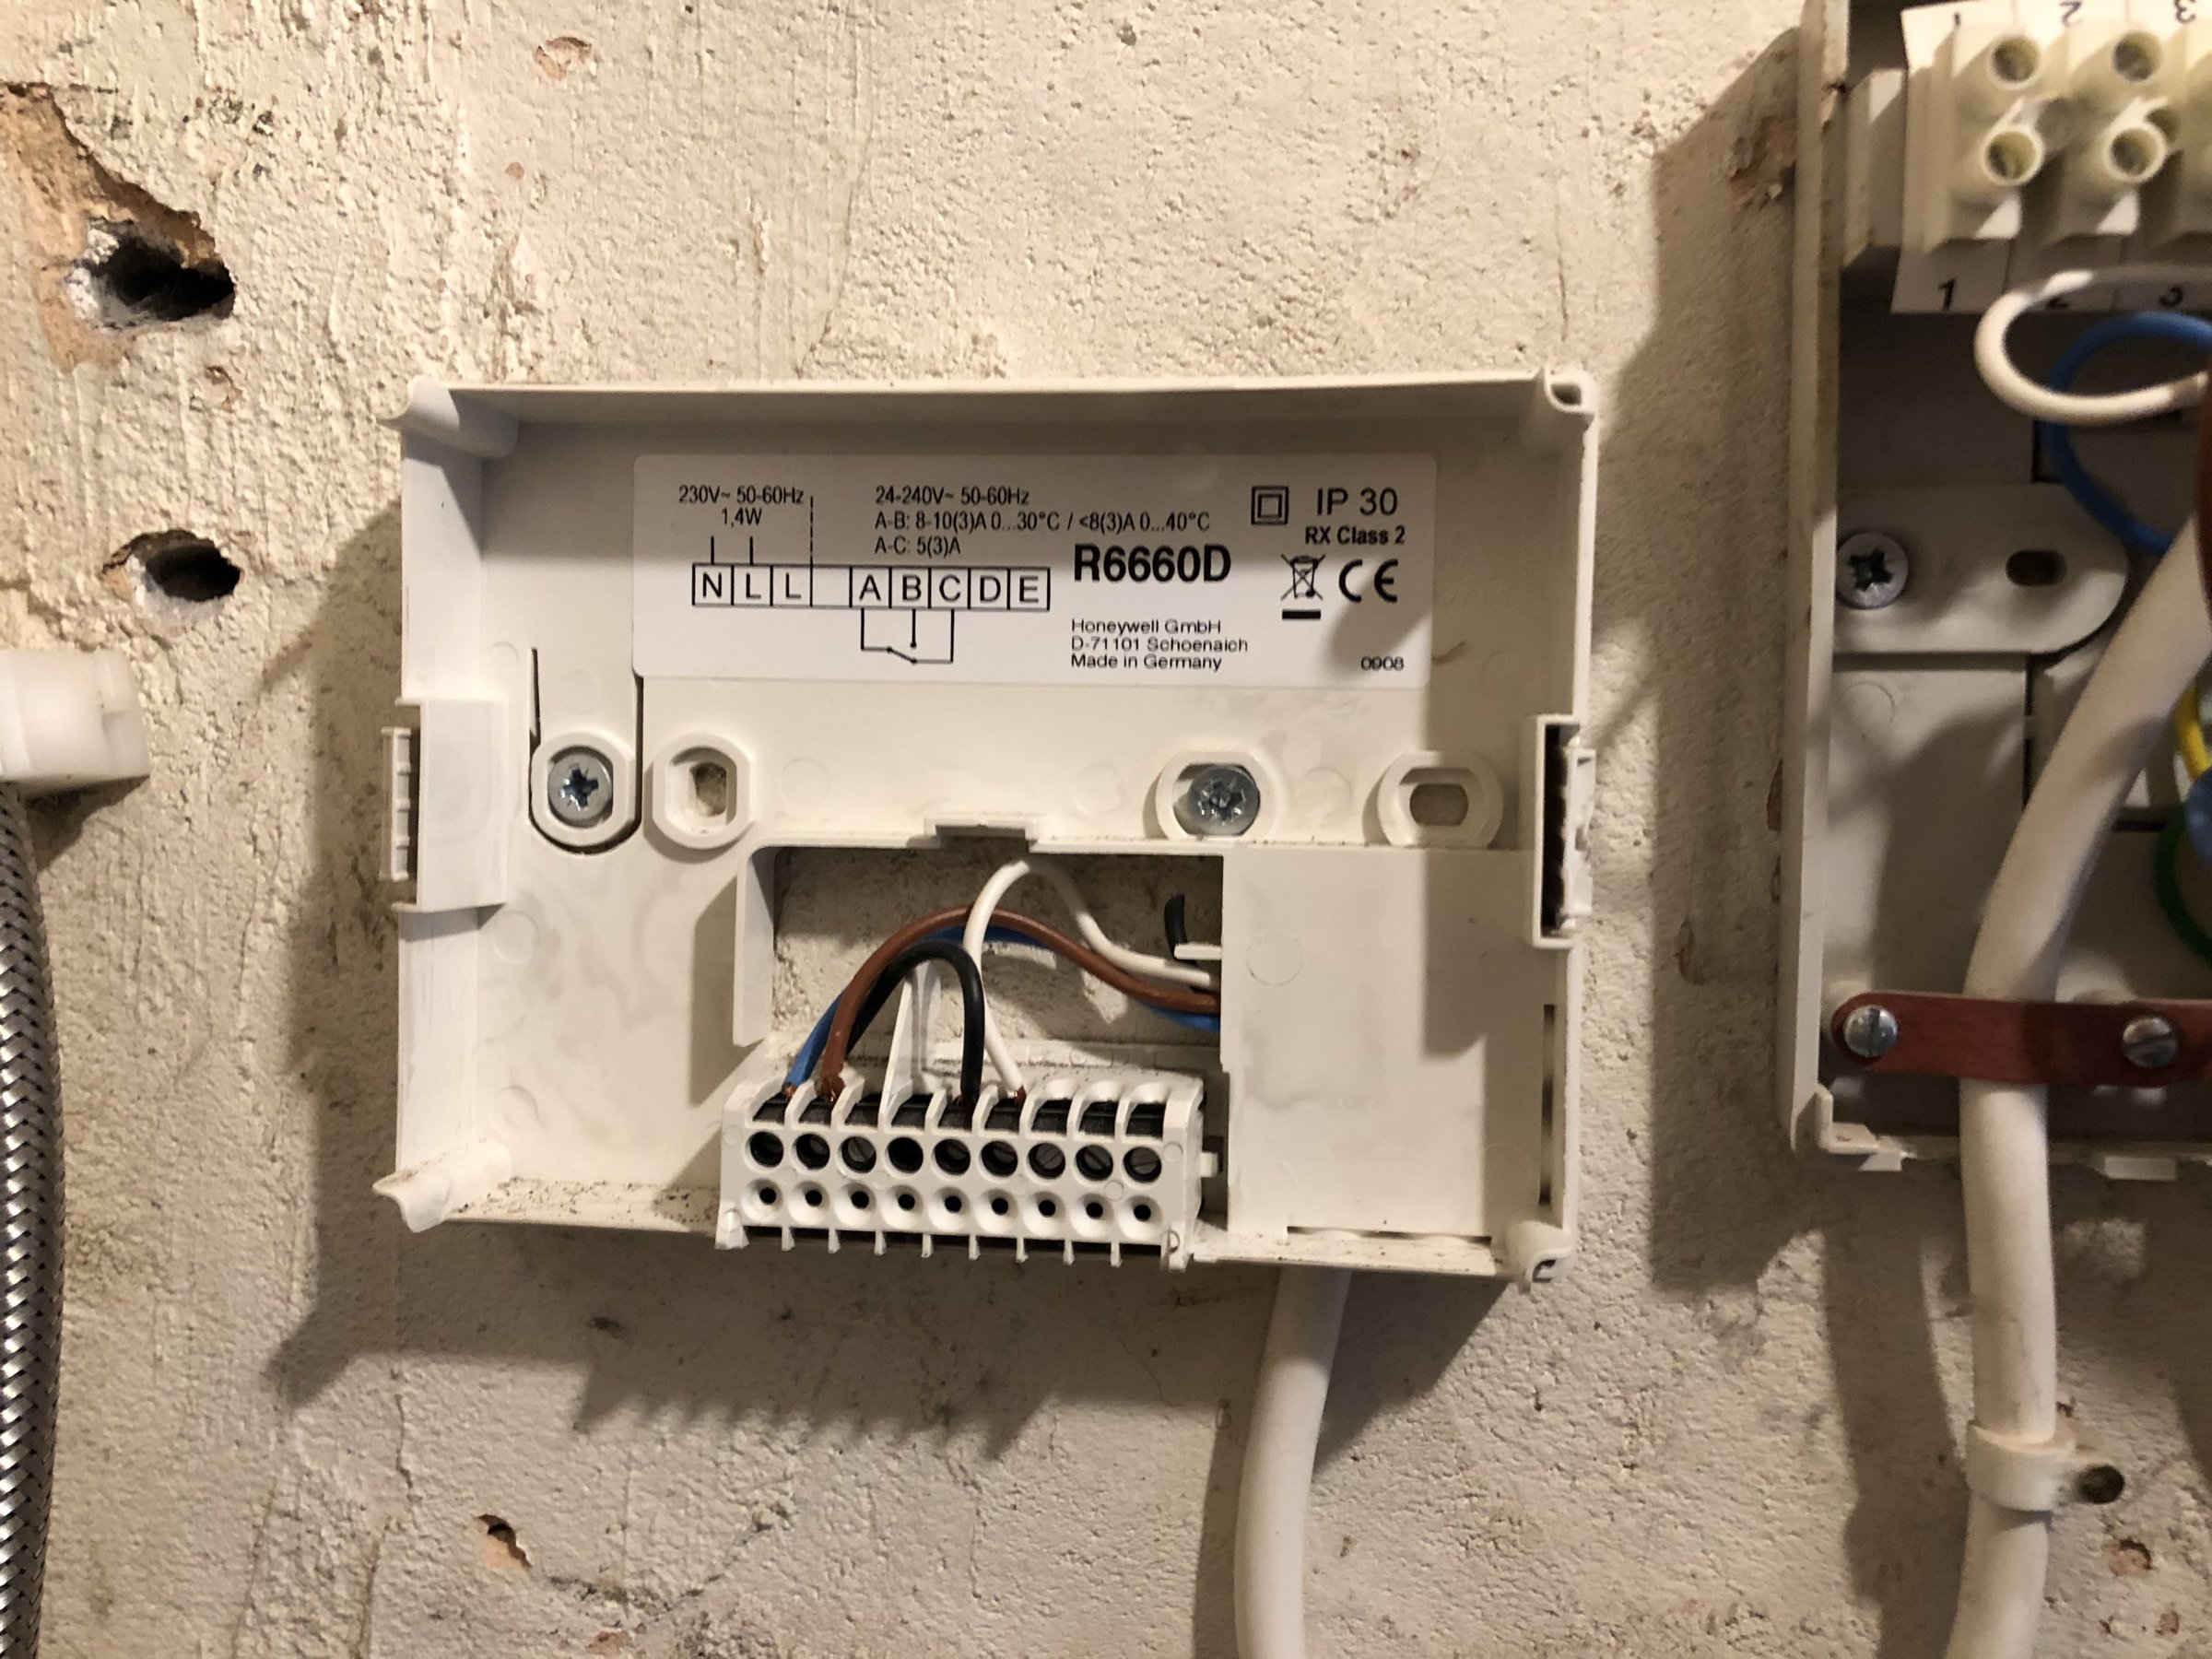
This is the wireless heating thermostat receiver.


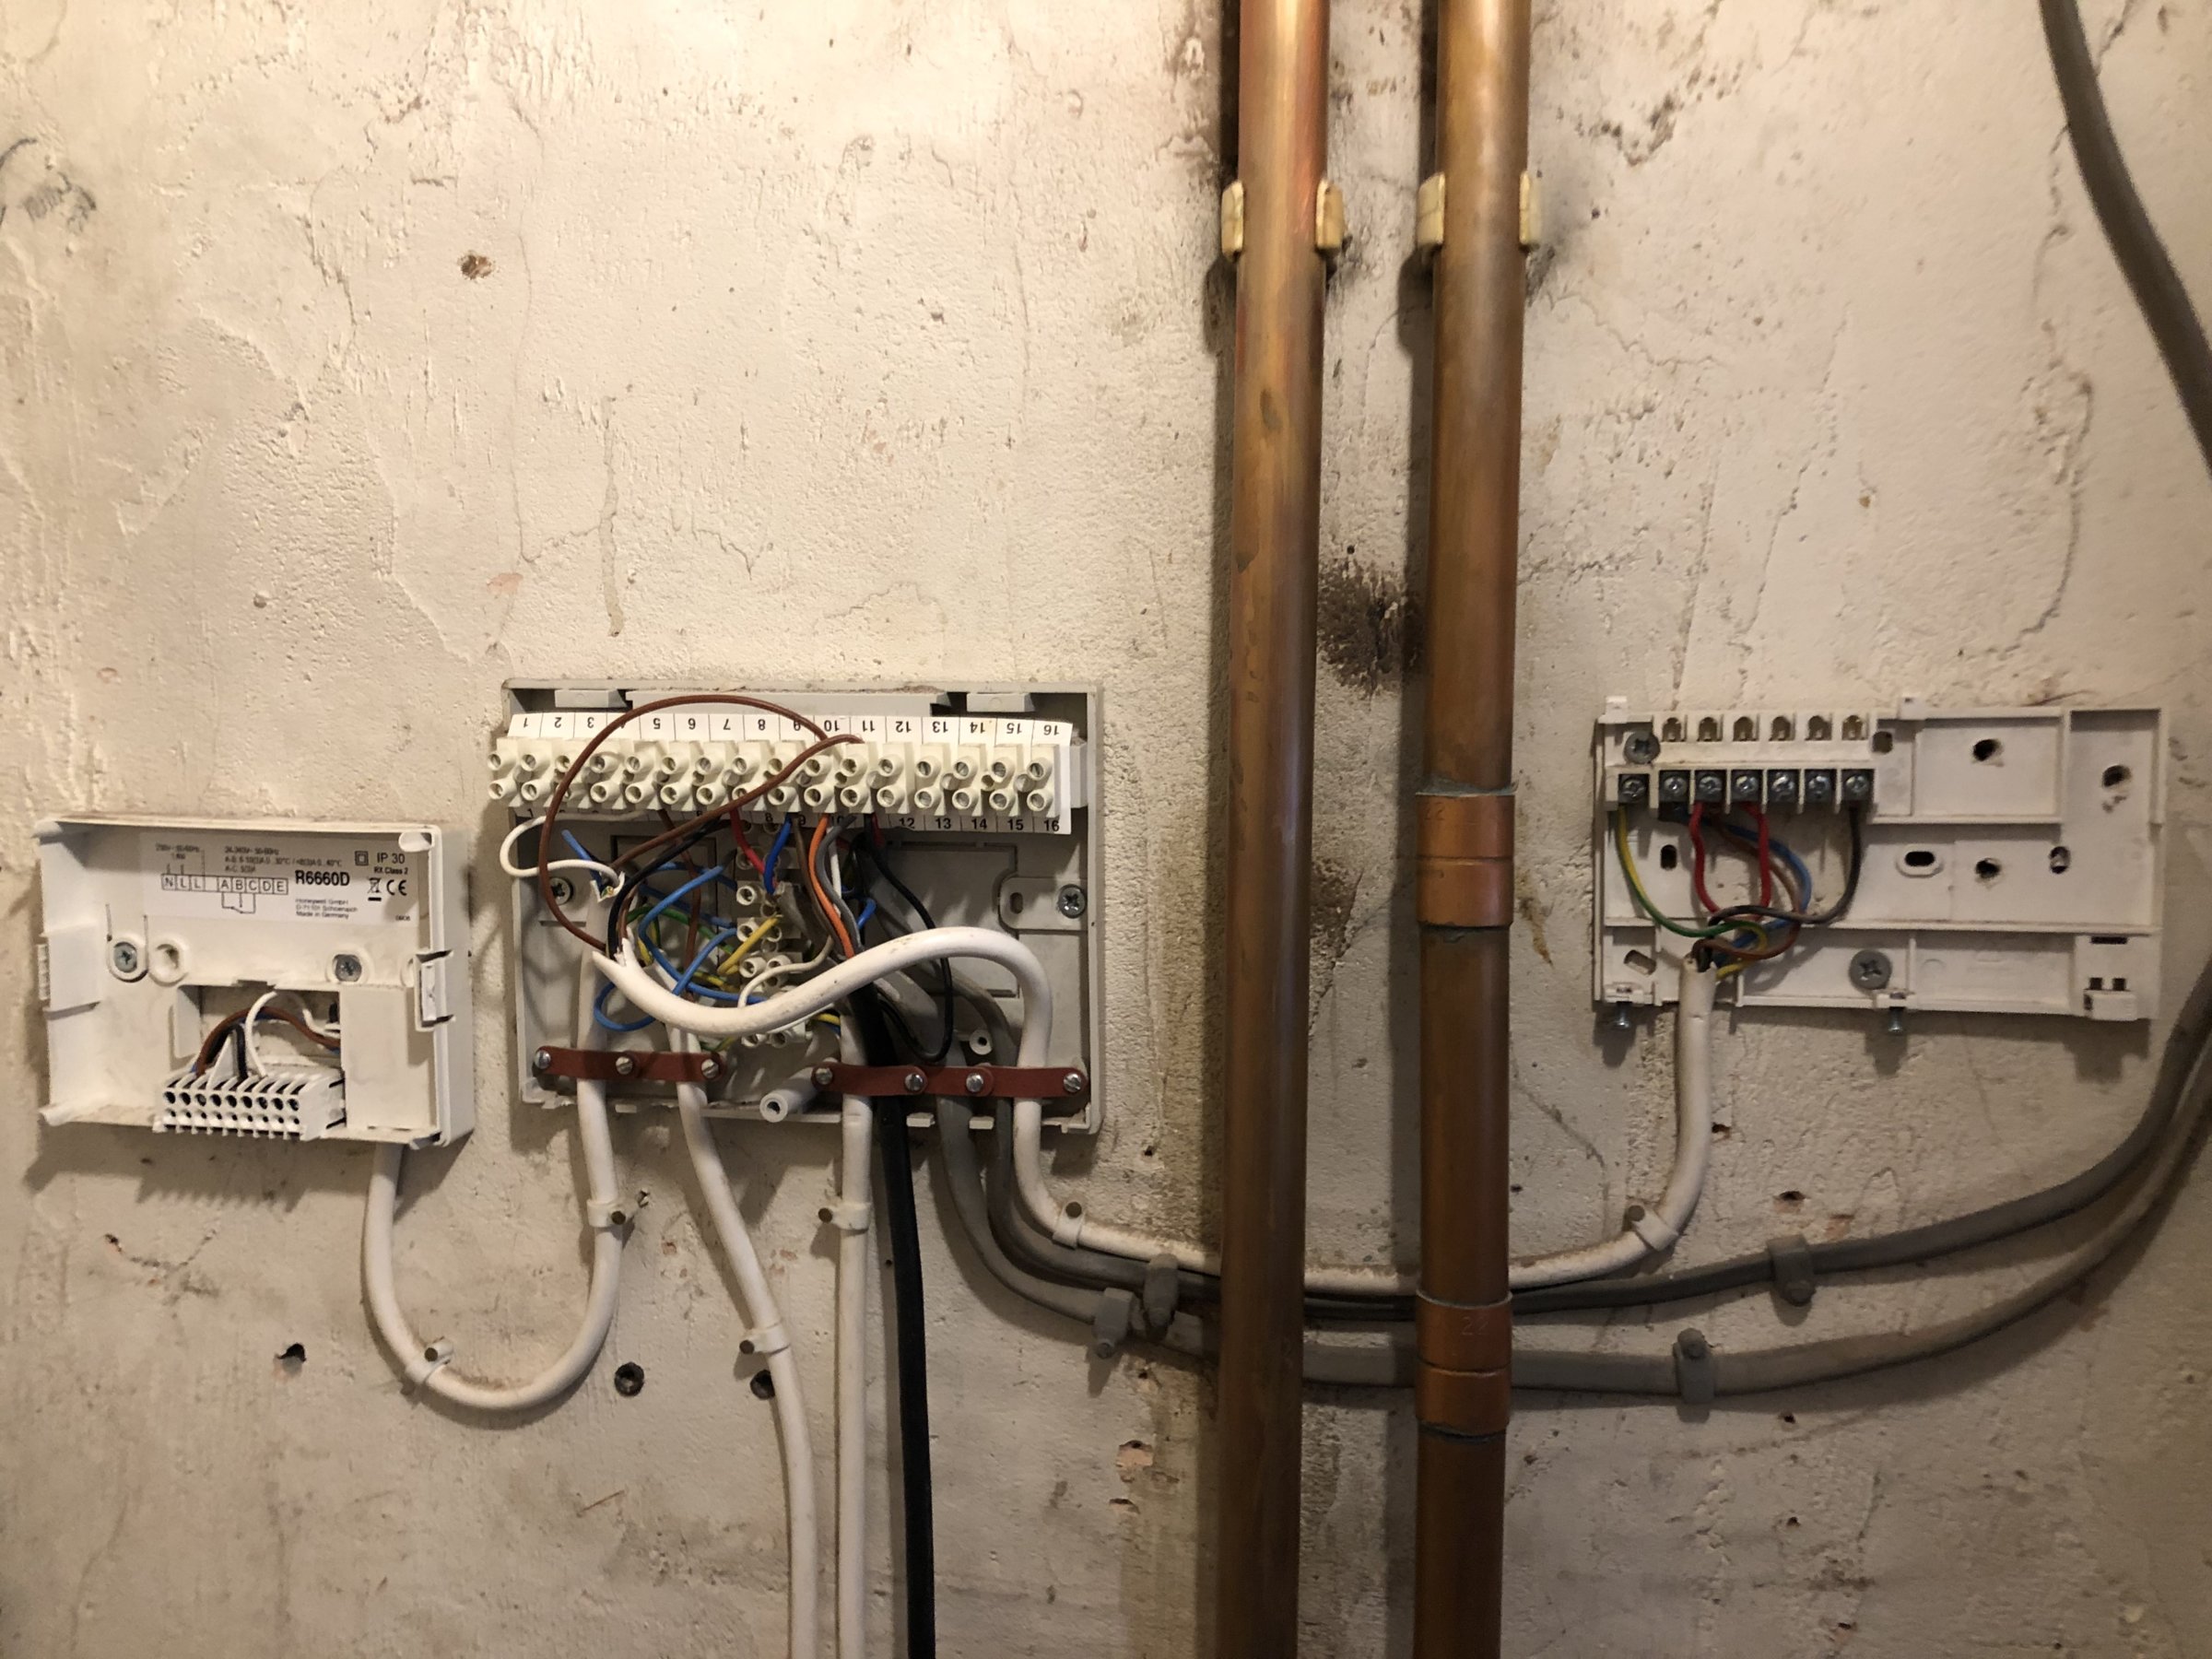
This is all three connected.

Any advice much appreciated. Many thanks.
 
Last edited:
Sponsored Links
The Wiser contains the switching for both heating and hot water, so the wires from the existing timer & thermostat receiver go to the Wiser instead. The link wires present at both of existing controllers are not required, as the Wiser has these made internally already. So, starting with the hot water timer wiring.

ST9100c.JPG

ST9100A Timer


The Blue wire now in the ST timer N goes to the Wiser two channel (N)
The Brown wire now in the ST timer L goes to the Wiser two channel (L)
The Black wire now in the ST timer 4 goes to the Wiser two channel (3) Hot Water On [This black wire is actually being used as a live, so it should have a brown sleeve over it to show this]
The Green / Yellow wire now in the ST earth goes to the Wiser earth

wiser.JPG

Wiser


Then moving to the R6660D thermostat receiver wiring

R6660D Receiver.JPG

Thermostat receiver


The White wire in the R6660D terminal B goes to the Wiser two channel (4) Central Heating On

The Brown Live in the R6660D, is not required at the Wiser because it has the L from the HW timer already connected. This wire can either be isolated separately, or put into the Wiser L anyway.

The Blue Neutral in the R6660D, is not required at the Wiser because it has the N from the HW timer already connected. This wire can either be isolated separately, or put into the Wiser N anyway.
 
Last edited:
The Brown Live in the R6660D, is not required at the Wiser because it has the L from the HW timer already connected. This wire can either be isolated separately, or put into the Wiser L anyway.

The Blue Neutral in the R6660D, is not required at the Wiser because it has the N from the HW timer already connected. This wire can either be isolated separately, or put into the Wiser N anyway.

That is absolutely fantastic. Thank you so much for taking the time to set all that out so clearly. I wish I could do more than just tick the “thanks” button for you!

One follow up question, if that’s OK, just to help me understand my system better.

I have, I think, an S Plan System, with two 2-port valves. I used to assume that the power supply to the thermostat ultimately spoke to the heating valve, and the power supply to the hot water timer ultimately spoke to the hot water cylinder valve. Based on what you say, I’ve been wrong about that, as the Wiser has only one power supply.

Presumably the Drayton will do what needs to be done to send power to each of the two separate port valves at the appropriate times, from its single power supply?

And presumably it won’t do any harm at all if, instead of isolating the extra N and L wires (which might be tricky, but I could look into it if you think it’s the better option), I wire them into the Drayton?

Thanks again.
 
That sounds like an S-Plan to me.

You are on the right lines with the theory. The existing two control devices are simply switches, on & off. Each has an input and an output connection.

There is a live output for the heating [the wire now in B of the thermostat receiver] that goes to the heating motorised valve

There is a live output for the hot water [the wire in 4 of the hot water timer] that goes to the hot water motorised valve (via a hot water cylinder thermostat, if fitted)

The N & L 230V supplies are there to power the devices, and the L is also used as the input to the switch which is why both existing devices have a short wire link between the L and the input to the switch.

The Wiser combines both switches for the outputs to the two motorised valves via terminals 3 (hot water) & 4 (heating). The L & N are there to power the device, but the link to the input of both switches to the L is made internally for you already.

The wiser doesn't need two 230V supplies. Personally I would use the Wiser terminals to put the spare wires in, rather than introduce additional terminals, or you could even snip the unused wires off at both ends of the cable, after disconnecting them at the wiring centre end of course.

As an illustration. If you had two single socket outlets they would each have wires going to them, but if you replaced both single sockets with one double socket then only one set of wires is required, (leaving the other set surplus to requirements) because the two sockets that make up the double are connected together internally. It's similar to what you are doing as regards the 230V supply. You are replacing two single switching devices with one double switching device.
 
Sponsored Links
Brilliant, that all really helps. Thanks again for taking the time to explain! I hope to tackle this job at some point before next Monday, and I feel much more confident now.
 
Hi, not sure if this is the right place to ask this question, but I have a simple set-up with a Potterton EP2001 with the attached wiring diragram that I’d like to switch to a Wiser set-up. 3 is hot water and 4 is CH. Do I just copy the wiring in the EP2001 but without the link wire between L and 5?
Thanks
 

Attachments

  • 7DC875BD-5327-4939-8BCF-0D0A16A9E035.jpeg
    7DC875BD-5327-4939-8BCF-0D0A16A9E035.jpeg
    49.9 KB · Views: 297
Hi Miguel

The Wiser has the link to L made internally for you already, so an external one is not required; hence no terminal 5.

If any of the other EP terminals are used A B C D or the earth and N strips at the sides, any wires in them should remain connected together exactly as they are now.

If you have an existing room thermostat it can't just be disconnected otherwise the heating wiring will be 'open circuit' and not operate.

FYI, for next time you should start your own new thread. Adding your question to someone else's is know as hijacking and is against forum rule 6
 
As @stem says you should not hijack a thread, the Drayton Wiser
upload_2021-3-25_14-15-17.png
has the ability to work with two central heating zones, and also can have an OpenTherm module
temp2.jpg
so the wiring can be complex, I do not know of any other system that can do this, the EPH thermostats can be set as master/slave, but how it is wired depends on the boiler used.

If the boiler has OpenTherm then wiring is different to a boiler without OpenTherm, and since it seems the old control was not OpenTherm enabled then to add OpenTherm would likely need some rewiring.

Even with my own house I made an error when wiring, easy to do, and I decided best option was start from scratch as it seemed clear it had never worked correctly, all I did was use existing cables.

The problem is an answer to @Miguel Ortiz will not be same as answer to @nwrmartin and neither say what boiler.
 
In case it helps, the instructions given to me worked perfectly, and I have a Worcester Greenstar Camray 25/32, oil fired.
 
Thanks all. You’re right ericmark that mine does not have opentherm. I’ll report back once it’s all (hopefully) working.
 
Thanks very much Stem, and sorry for getting that wrong.
No worries. (y) New posts are flagged as such, so if you use an existing one, you will find that many people will assume it's a continuing dialogue and won't bother scrolling to the bottom of an existing thread to see your new post. A new thread is much more likely to be seen by those that can help.
 

DIYnot Local

Staff member

If you need to find a tradesperson to get your job done, please try our local search below, or if you are doing it yourself you can find suppliers local to you.

Select the supplier or trade you require, enter your location to begin your search.


Are you a trade or supplier? You can create your listing free at DIYnot Local

 
Sponsored Links
Back
Top