Fitted wardrobes plan, suggestions appreciated

Yeah I get you. The you tube videos make it look so easy and are lulling me into a false sense of security I imagine.
Well, it isn't rocket science, that's for sure, and people sometimes think I'm bonkers when I tell them it was 4 years to do two City & Guilds tickets and at that point you still didn't used to be out of your time as you needed another couple of years as an "improver". However, modern kit makes some of the job fairly easy, but there is still an amount of learning involved

In the past when I DIY'd, I never had the cash to buy decent tools, and youtube didn't really exist in the same way as it does now in 2006. Things are different now, I don't mind investing in some reasonably priced tools and accessories and the learning resources available are great.
YouTube is a blessing and a bane all in the one. Some of the techniques shown make my toes curl, some of them make me grimace (waiting for appendages to be removed - this is especially true of Americans who frankly often have a cavalier attitude to personal safety on machinery like trable saws), and then there is some truly good stuff - like much of Peter Millard's.

Just going to have to bite the bullet.
Well, I'm NOT saying don't do it. I am saying start small and make your mistakes on a cheaper, less important piece. When I bought my first track saw 20-odd years ago I think the the first thing I made was some boxes to store stuff in for the back of the van, out of some secondhand Contiplas boards which had come off a job as ripped-out scrap, using a biscuit jointer to put it all together. It was a revelation - much faster than the traditional methods I'd been taught and a lot more accurate. The following day I started putting in a 2500 square foot plywood floor in a mill, cutting plywood to fit the existing joists with that saw. That's where I learned that I needed a cutting table at waist height, and from that came the trestles and the cutting table (see above). Within weeks I'd started making furniture for home, but the initial trial and becoming familiar with the tools were necessary steps
 
Last edited by a moderator:
Sponsored Links
What type of router would I need to buy to attach to a homemade non adjustable routing table, which would take a grooving bit for making door styles and rails?
 
1/2in would probably be better, if not then 8mm or a more powerful 1/4in. Doesn't matter if it is a plunge base or fixed base, but if it is a plunge base you will need to ensure you can get a fine deoth adjuster for it, or have a car jack or the like to adjust height. 8mm has the advantage that it is a lot easier to use for veneer edging/lip trimming. Incidentally, an 8mm router can edge groove boards using a bearing guided grooving cutter - a table isn't absolutely essential.

If you are thinking about veneered frame and panel doors I'd caution against that - in very narrow strips the veneere tends to disintegrate when routed (assuming that you edge band then groove)
Thanks, Im leaning back towards painted finish now. Or at least, painted doors on a veneered carcass.

I am struggling to see which types of router will work and how the depth is adjusted on them. Any chance you could link a budget model so I know what Im looking for? Is a smaller handheld router suitable for table mounting so I can also use it for freehand work like minor bevels or routing out a channel?
 
Sponsored Links
Would this router be suitable for cutting grooves in rails and stiles, for mounting under a home made table?

This is the cheapest 1/2" one.

I dont really want to mess about trying to mount a car jack under the table. Just want something simple that can cut grooves and route a few chamfers.
 
I dont really want to mess about trying to mount a car jack under the table. Just want something simple that can cut grooves and route a few chamfers.
The "messing about with a car jack" comes from your earlier requirement to be able to use a router under a table. To make this a viable proposition with any router you need to have or be able to fit a fine depth adjuster which allows you to wind the router in up and down when the router is mounted under the table. or mess about with the aforementioned car jack. Looking at the details on-line the 1/2in router appears to have this (although how well it works I cannot say), the 1/4in McAlister doesn't (but it may be able to use the Trend adaptor for the MOF96/DW615/T5 family of routers). Let me get back to you on that
 
Last edited by a moderator:
@JobAndKnock im getting confused looking at them. When watching online videos, the router slung under the table seems to have a large ring on it which you turn to move the router up and down.

But i don't see these for sale anywhere - they are all plunge routers.

So Im not understanding what is going on here.
 
Then stop watching American DIY videos! TBH American weekend warriors seem fixated with running their fixed base routers inverted in a router table and doing almost everything in a router table (and often spending as much or more than a shaper costs :rolleyes: ). That is either naivety or ignorance, especially when you consider that plunge routers can do everything that fixed base routers can, whilst being able to do stuff that fixed base routers can't do or at least would be difficult or dangerous to do with one (or just extremely slow and error prone), e.g. plunge cutting mortises (almost impossible, limited, error-prone and hazardous with fixed base routers), sinking hardware flush to surfaces, doing jobs requiring multiple stepped passes - as you would for routing a kitchen worktop, etc. That is why in the 1990s both Bosch and Porter-Cable introduced plunge bases for their somewhat underpowered fixed base routers. (I'll now wait for the counter arguments, which statements like the above invariably generate)

What I find odd is that plunge routers were actually patented by the same American, Ray Carter, who was responsible for so many firsts in routing (e.g. the use of collets in routers, built-in shaft locking to make changing cutters easier, concentric guide bushes for template routing, the adjustable side fence, having spiral cutters to reduce power requirements whilst improving surface quality, the hinge recessing jig, the portable dovetail jig, as well as inventing a family of electric door planers based on his router motors). Quite a guy! Especially as almost all his patents were issued back in the 1920s. He actually did put most of his ideas out there on routers he manufactured, dominating the early electric portable router and power planer market in the USA, before finally selling out to Stanley in 1931. But neither he nor Stanley made his last invention, the plunge router (unless you consider a few 1970s Stanley models which were made long after Stanley had frittered away their patent and market share advantages). It actually took the German firm of Eugen Lutz (Elu - the firm upon which the modern deWalt brand was built) to create the world's first production plunge router in 1949 - the Elu MOF11. They were also responsible for the turret depth stop/depth flag arrangement, the variable speed portable router and the world's earliest consumer-level plunge router in the 1970s (the MOF96). Ironically, deWalt is now part of the Stanley-Black & Decker conglomerate

But enough of history. Just take it that Europeans and Japanese use plunge routers, whilst Americans are still living in the 1940s, and check that if you buy a plunge router, that there is a fine depth adjuster available for it which allows use in a router table...

Lest I am considered biased against fixed base routers, here is one of mine, a Bosch 1618EVS (GMF1400 in Europe) with a D-handle fixed base:

Bosch 1618EVS Magnesium 001.jpg


Despite being a fixed base router, I've found this design awkward to use in a router table because of the depth adjustment being so poor and hard to use when the router inverted (added to which if you undo the buckle a bit the motor falls out of the base and can hit the floor - oops):

Bosch 1618EVS Magnesium 002.jpg
Bosch 1618EVS Magnesium 003 Depth Adjuster.jpg


That motor really needs to be installed in an expensive router lift to make it more useful in a router table. In fact Porter-Cables seem to be better router table routers (assuming if you don't want to spend £100s on a router lift), because they use a copy of the old screw the body in-type depth adjustment originally designed by Ray Carter. However, since P-C manufacturing went to China in the early 2000s the quality has apparently gone down a lot, and in any case, there hasn't been an official distributor of P-C tools in the UK for more than 25 years. Against that, many modern plunge routers can be used in a router table by simply installing a fine depth adjuster like this one (below) for the MOF96, which also fits a lot of other routers (e.g Trend T4/T5, deWalt DW613/DW615, Perles OF808, some of the Ferm and Power Devils routers, etc) at about £15 to £20 a pop:

Trend FHA Height Adjuster.jpg


this is a fine height adjuster fitted to a Trend T4 router:

Trend Fine Height Adjuster on a T4 Router.jpg


instead of using the turret and depth flag to control the plunge depth, the fine adjuster is screwed onto one of the threaded rods on the turret and is turned to very precisely adjust the depth of cut. With the router in a router table this would mean the router would function in the same way as a fixed base router (without the annoying tendency some of them, like the Bosch fixed base routers have, of falling out of the bottom of the router table if you undo the base lock). If you look on the Trend web site there is a compatibility section for a large number of routers that tells you which of their bits fit which routers. A lot of the Trend stuff either dates back to or is based on the Elu MOF96 router, partly because so many of its' features were so widely copied since the 1970s.

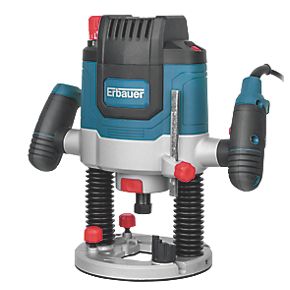
I went and had a look at the Erbauer ER2100 router - it is very similar to the Trend T7e (below), with the same type of fine depth adjuster built-in:

Trend T7E Router.jpg


I reckon both of them would be useable beneath a router table, but that depth adjuster is going to be hard work unless there is some way to get a bigger diameter handle on it.

I did watch a review of the MacAliister MSR1200 on YouTube but what I got from that was that the tool has an American-style turret depth stop which lacks the adjustable screws of European style ones as on the Black and Decker SR100 to the right (below). The SR100 was a partial copy of the Elu MOF96 (with a redesigned body) made in the 1990s which was eventually renamed the deWalt DW613 and is still available in some markets:

MacAllister MSR1200 Depth Stop Turret.png
Black and Decker SR100 Router Turret Detaiil.jpg


(BTW the guy reviewing the MacAllister uses the fence wrong and at about 6:00 has the fence mounted on the wrong side of the cutter, risking a kick back - the rule is material to the left, cutter to the right, fence to the right of the cutter and push the router away from you - he keeps doing that he'll have an accident sooner or later, although at 7:00 he does correct his error, then pulls the router towards himself which is just as dangerous!!! So if you get a router RTFM - read the flaming manual)

The adjustable depth stop screws on turrets are more versatile and allow a fine depth adjuster to be screwed on and used, as on the Trend T4 above. If your router lacks that feature, a car jack really isn't a bad alternative, or something like this router height adjuster off eBay for about £8:

Router Height Adjuster.jpg


But as I said before - you really don't need a router table to cut grooves for panels, and certainly not to rebate out for cabinet backs - and in any case with larger pieces it is almost always safer to take the router to the work and NOT the other way round

Whew!
 
Last edited by a moderator:
you really don't need a router table to cut grooves for panels
I appreciate your detailed posts @JobAndKnock, however I'm not much closer to knowing what to buy for my hobby projects.

If I'm making shaker panel doors upto 2m in length, please can you advise what I should buy?
 
i think there is another wardrobe thread here, which i replied to recently - maybe on another DIY forum
I cant find at the moment , but if i do find it will post a link
EDIT found it - https://www.diynot.com/diy/threads/fitted-wardrobes.596234/#post-5292079 some good suggestions and ideas on that thread

I have made quite a few fitted wardrobes in the past houses - 7 or more , various types , and i only had basic tools
some in alcoves , the first house i had i used internal doors and then made a carcus and either painted or wall papered to match the room , with architrave around the doors and in some cases coving around the room.
I have used Ikea doors , and made my own

I have also recently made shaker doors style for a cloakroom, and panelling - all with fairly basic tools ,
heres Peter Millard video
on shaker doors
to be honest I have watched ALL his videos now and all excellent , and of course this forum where I have had a lot of help and advice

If you are getting into making a lot of furniture , then maybe a list of tools , what you have at the moment - perhaps in the tools thread so separate from this one on wardrobes

I would suggest Peter Millard videos , I also subscribe to Rag 'n' Bone Brown , skillbuilder , Robin Clevett and many others , mainly UK based as others have said some videos are just crazy.

another video maybe worth a watch is Peter Millards making carcuses
others
 
Last edited:
I appreciate your detailed posts @JobAndKnock, however I'm not much closer to knowing what to buy for my hobby projects.

If I'm making shaker panel doors upto 2m in length, please can you advise what I should buy?
1. You don't need a a router table. You can do the job perfectly well with a 900 watt or so plunge router. 8mm is better than 1/4in if you can get it, but will be more expensive (see deWalt DW613 or DW615, Trend T5, etc). I can't advise what would be a good router, partly because you haven't given any idea about budget other than to say "tight". My own experience is mainly in using trade rated routers - and they generally aren't that cheap - but I reckon something like a Maktec (Makita) MT3601/Makita RP0900 would do the job and is about the cheapest trade rated router I've ever used (900 watts, 1/4in) The best price I found on the MT3601 was £62, on eBay, whilst the best price on the RP0900 was about £95, also on eBay. They don't have lots of bells and whistles, but they do work, and parts are easy to come by as they've been around in one form or another for 30-odd years. If anyone has a better suggestion, please chime in

2. You do need a grooving cutter. I'd suggest an appropriate arbor - the T3010 or T3010-8 will be adequate, a grooving cutter - 6, 6.4 or 8mm depending on the thickness of your MDF panels, a guide bearing (click on the red "Guide Bearing" button on the grooving cutter page - I'd suggest a TB760 to give you a 10mm deep groove. I'm recommending Wealden as their stuff is decent quality and they always dispatch promptly. That's based on 20+ years of using them

3. All the cuts will be done by the saw, so you need a saw and a guide. Even the "rail" can be home-made out of MDF or thin plywood and 2 x 1in softwood. For setting up repeat rip cuts a combi square (such as a Bahco CS300) is essential - avoid cheap combies, And whiklst you are about it get yourself a decent 5m tape measure, e.g Stanley Fat Max, Bahco, etc. Cheap tapes don't last and tend to be inaccurate

4. To do the rebates for the back panels get a rebate cutter. The depth is up to you, but a 10 to 14mm rebate would be suitable for an 8mm back. I;d do these with a fence and a straight cutter, but as a first time user that's maybe asking a lot

5. You need to make-up a cutting table and have a flat assembly area. I cannot emphasise those two points enough

6. You'll need some way to drill hinge holes accurately. That means something like a corded drill in a drill press with a home made bed and fence. It is a bit fraught to do these freehand. A corded drill will also be useful for drilling dowel holes

7. You may need a dowel jig with a matching brad point twist bit and stop collar. 8mm is a good size

As @ETAF has said. keep the tools separate from the construction
 
Links in this post may contain affiliate links for which DIYnot may be compensated.
I have only seen videos of people grooving door rails using a router table, I can't seem to find video of people using another method @JobAndKnock ?

Im ok on the plunge saw and guide rail, and the need for a flat large bench. No problem. Its the making of the doors if Im going to use the rail and stile method.
 

DIYnot Local

Staff member

If you need to find a tradesperson to get your job done, please try our local search below, or if you are doing it yourself you can find suppliers local to you.

Select the supplier or trade you require, enter your location to begin your search.


Are you a trade or supplier? You can create your listing free at DIYnot Local

 
Sponsored Links
Back
Top