Installing Lightwave Smart Switch

Joined
3 Aug 2012
Messages
190
Reaction score
0
Location
London
Country
United Kingdom
I have just purchased 1-gang and 3-gang lightwave light switches.

I have installed the 1-gang in the passage and apparently it's the slave in a 2-way circuit.

The 3-gang switch in my living room has 2 normal switches and one which connects to the passage in the same 2-way system.

Have a look at the image of my existing 3-gang switch and of the new Lightwave 3-gang switch.

The one on the left is the 2-way switch and should connect with my passage.

But the terminals on both switches don't make sense to me so I don't know what to wire where.

On my existing switch, they are labelled - Live | S | X - from left to right on the image below.
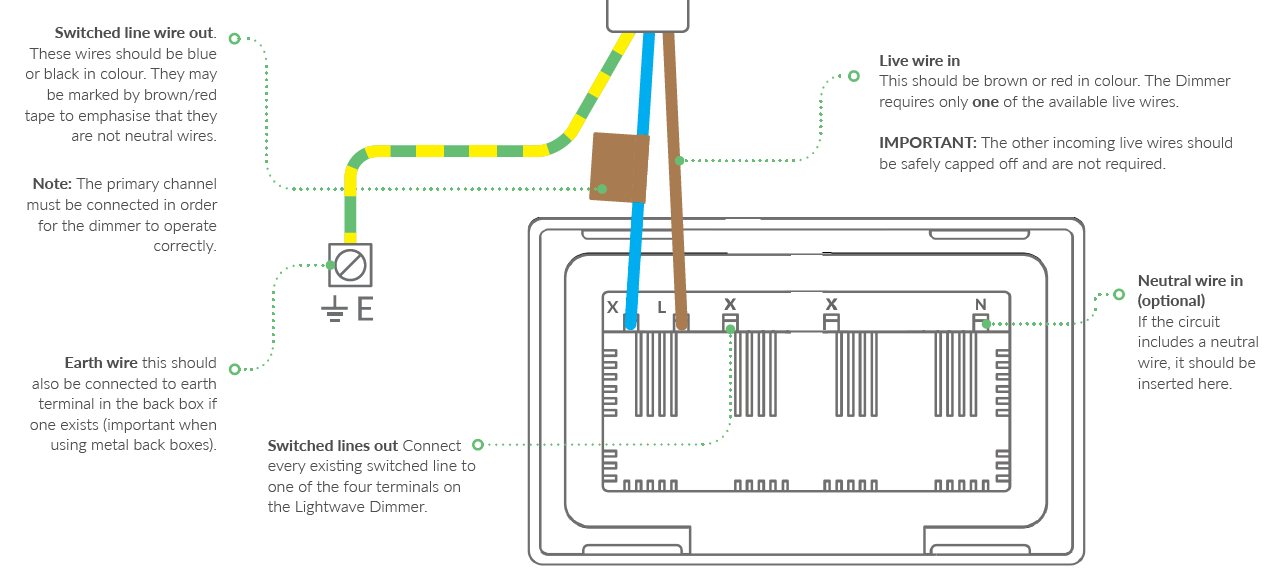
On the new Lightwave switch, it's confusing.

Can someone guide me on what to connect where to still achieve the 2-way system with the passage?

Appreciate the help,

JH

Existing-3-Gang.JPG


Lightwave-3-Gang.JPG
 
Sponsored Links
There doesn't appear to be any neutrals at your switch ,unless they are out of sight in your pic ??
Some do not require a neutral ,but there is a neutral terminal on yours ,maybe it's just to" park " neutrals . Maybe someone with more familiarity with these can elaborate.
 
Last edited:
No more wires in my backbox.
I have heard that some systems don't have a neutral wire. Maybe that's what mine is.

But I'm just wondering what to connect where.

JH
 
No more wires in my backbox.
I have heard that some systems don't have a neutral wire. Maybe that's what mine is.

But I'm just wondering what to connect where.

JH

MOST houses don't have a neutral at the switch, unless they are pretty new builds or recently rewired taking the needs of home automation into account. If that unit requires a neutral some work on the installation wiring will be needed. Easier to get a different dimmer.

However, as that is an L23, then the Lightwave site says the neutral is optional, so you are in luck:

pf-959428eb-f17e-4884-9176-f97f65ad68db--L23.PNG


PS: the site says that these are suitable for 2-way switching but I can't find any slave switches that are needed for 2-way operation:

https://support.lightwaverf.com/hc/en-us/articles/115001449671-What-is-2-way-switching-
 
Last edited:
Sponsored Links
Yeah, I got that.

But which wire do I connect to which post on the new one to maintain my 2-way system on the left switch?
 
Yeah, I got that.

But which wire do I connect to which post on the new one to maintain my 2-way system on the left switch?

I think you need a special slave unit at the other end for 2-way.
 
Can someone guide me on what to connect where to still achieve the 2-way system with the passage?
All the switches are connected in the same way - L and SL to each.
You will need to establish which of those 3 wires are L and SL, connect those, and insulate the other one in a spare terminal.

Switching from multiple locations is set up using the app after the switches have been installed.
 
I know which one is L (the wire on the left).
But the middle one is marked S (not SL). Is that the same?
Then there are X slots also.
 
All depends on what those three wires are connected to at the other end.
Without seeing that, it's just guessing.
 
That lightwave dimmer has 1x live and 3x switch lives out, i can't see how it will ever work as it's not a 2 way lightwave dimmer unless you use 1 core ie grey into a connector at the slave end connected to the light switch live, and then the live into L and program it on the app to match the living room, this will require the lightwave hub and app also.
 
Assuming it's a new generation Lightwave switch and assuming that the browns are live, and that the blues are switched live (they need sleeving) in the one way switches (you need to be sure of these assumptions before proceeding):

Connect all three browns into the 'L' port on the new Lightwave switch.

The 'X' ports on the Lightwave switch are the switched lives, so put one blue wire into each one of the two you want to act as single light switches. Note that that the one that is on its own (to the right of your photo) is special. As you have no neutral, it's the one over which a low current will flow to power the light switch even when the light is off.

For your two way switch, life is a bit more complex. You need to look at the switch at the other end and work out which of the various two-way switching wiring layouts you have. There are plenty of diagrams on here to help you do that (look in the FAQs) and on the LightwaveRF website. However, one of your wires (following the assumptions above - the grey or the black) will be a 'strap' between the two switches. This is redundant in LighwaveRF land - all you need to do is use any two cores (suitably sleeved) to propagate power to the other switch and connect the switched lives ('X's) on the two of them together. Then, create an automation in the app to link them into a switching pair.

Note: If you are very lucky and clever, you may be able to reuse the redundant strap wire plus a convenient switch drop wire (all sleeved blue) to create a neutral that you can apply to these switches; although optional, it'll improve them no end. If you don't know how to do that safely either don't or ask a spark.
 
This was my single passage switch just before I swapped it with a Lightwave single switch.
This is the slave 2-way switch which connects with one of the switches in my 3-gang.

From the left, it shows Live - S - X.

I have kept the wires in the same places on the Lightwave switch.
The Live went into the N. The S went into the L. And the X went into the X.

From my understanding, this is the way I should wire it.

passage.jpg
 

DIYnot Local

Staff member

If you need to find a tradesperson to get your job done, please try our local search below, or if you are doing it yourself you can find suppliers local to you.

Select the supplier or trade you require, enter your location to begin your search.


Are you a trade or supplier? You can create your listing free at DIYnot Local

 
Sponsored Links
Back
Top