Nervous about my kitchen light setup

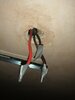
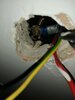
OK thanks for your help. Kitchen light is a strip with 5 spot lights. The bathroom light fitting would not be able to house the connectors though, I take it they can't go up through the hole either?
 
Sponsored Links
Ok ,strip with 5 spots ,you can do as I outlined. Bathroom ....need pics !!
 
Bathroom is exact same situation but with a plastic light instead. actually I think the hole in the ceiling is even smaller in the bathroom. Are there any alternatives to wago that are smaller?
 

Attachments

  • IMG_20201030_234550.jpg
    IMG_20201030_234550.jpg
    167 KB · Views: 183
  • IMG_20201030_234743.jpg
    IMG_20201030_234743.jpg
    167.4 KB · Views: 175
  • IMG_20201030_234736.jpg
    IMG_20201030_234736.jpg
    191 KB · Views: 177
THE METAL CONDUIT IS THE EARTH.

Or at least it should be.

An earth wire can be connected to the metal besa box, using a screw fitted to one of the screw holes.

Any joints you need to make can be made within the metal besa box. This box is about 50mm in diameter, so plenty of room.


A ring terminal crimp is the best way to connect the earth wire to the metal besa box.
 
Last edited:
Sponsored Links
THE METAL CONDUIT IS THE EARTH.

Or at least it should be.

An earth wire can be connected to the metal besa box, using a screw fitted to one of the screw holes.

Any joints you need to make can be made within the metal besa box. This box is about 50mm in diameter, so plenty of room.


A ring terminal crimp is the best way to connect the earth wire to the metal besa box.


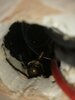
I actually have one of these ring terminal crimps shaped like a C, would it be possible for me to fit this myself or is an electrician required? There is some kind of screw thing attached to the box above the ceiling that I could screw it on to.
 
A ring terminal is best, then it cannot slip off.

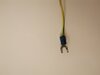
I have come across lots of these installations, both in low and high rise blocks and LA housing stock. The conduit is usually well connected to earth, with a nice low reading, but it's best to test it before committing to Class I luminaires.
 
Basic question, how would you go about attatching a C-shaped ring terminal to the above screw shown in the attached image? Would it be safe to even attempt this?
 

Attachments

  • IMG_20201030_224754.jpg
    IMG_20201030_224754.jpg
    114 KB · Views: 161
Just stick it under that screw head, and tightened up the screw.

You could remove the paint where the screw goes, but I don't see any point as the screw isn't painted, and the screw hole won't be painted either.

An O shaped crimp is better than a C shaped one, it may not stay in place.

The size of the cable you use must be the correct size to suit the crimp.

What colour is your crimp?
Red, blue, yellow?
 
It's blue - pic attached
 

Attachments

  • IMG_20201109_212437.jpg
    IMG_20201109_212437.jpg
    75.3 KB · Views: 166
It was already like that as it was taken from the bathroom light wiring. I'll give it a try as it seems easy and safe enough to do myself.
 
Okay, I've had a go and I can't get the screw in the pic to screw in any further leaving too much space between the screw head and the point of contact therefore the ring terminal does not fasten in tightly. I think this is because the screw is hitting the upper part of the conduit and there is no more space for it to be screwed in further. Should I simply try another screw?
 
okay guys thanks for your help. wiring sorted as per the pic attached - hopefully this won't blow up in the middle of the night!
 

Attachments

  • IMG_20201111_125712.jpg
    IMG_20201111_125712.jpg
    162.5 KB · Views: 145

DIYnot Local

Staff member

If you need to find a tradesperson to get your job done, please try our local search below, or if you are doing it yourself you can find suppliers local to you.

Select the supplier or trade you require, enter your location to begin your search.


Are you a trade or supplier? You can create your listing free at DIYnot Local

 
Sponsored Links
Back
Top