
You are using an out of date browser. It may not display this or other websites correctly.
You should upgrade or use an alternative browser.
You should upgrade or use an alternative browser.
Stihl MS170 non starter
- Thread starter ipbr21054
- Start date

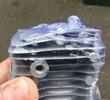
Pic isn't clear enough to tell , are there any vertical scores in the rings
well it definitely needs piston and rings, will the cylinder clean up of alloy transfer or require new as well.
Any reason why you've stripped it so far?
Any reason why you've stripped it so far?
Don’t use any abrasive paper at all.....the cylinder is plated and it will end in tears.
Use a universal silicone sealant to reassemble, the original would have been orange in colour.
New piston and barrel required.
John
Use a universal silicone sealant to reassemble, the original would have been orange in colour.
New piston and barrel required.
John
Yes, that’s a good move....I use two stroke oil for reassembly but any oil will do.
With the new piston, the arrow on the top points towards the exhaust port, observe the pegs that stop the rings rotating and carefully slip the piston into the barrel.....the bottom of the barrel is tapered so it’s easy to do.
The original problem is caused by a dirty air filter or poor quality oil.
John
Hi,
Parts have arrived BUT
The top 2 fins etc have bent in transit,it doesnt seem to me that its a problem but what do you think ?
Also ive been reading that the piston should have a mark on it for which it faces say exhaust side but the piston received has no markings so what should i do in respect of which way round should i fit to con rod.
Thanks
Attachments

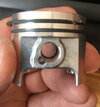

You could bend those fins straight but it’s not a good start!
Compare the piston with the old one in respect to the ring pegs and therefore orientation .....the ring ends mustn’t click in the exhaust or transfer ports.
John
Compare the piston with the old one in respect to the ring pegs and therefore orientation .....the ring ends mustn’t click in the exhaust or transfer ports.
John
Ring pegs ?
Ive fitted the rings to the piston & aligned them with the little pegs in the groove.
Ive heated up the old connecting pin & removed it, I then fitted the new pin, I did notice when you go to put those wire clips either side of the pin they face either forward or backward, As shown in attached photo
So i fitted this piston to the con rod the same way.
Using 2 stroke oil i put some inside the bore & also on the rings then popped the piston into the cylinder.
I can turn the crank & the piston moves up & down freely.
Does this sound correct ?
Awaiting sealant to arrive so i can fit the sump on correctly.
Attachments
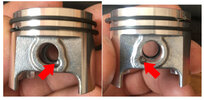
Yes, those pegs prevent the rings rotating in their grooves......if they did the ends would catch in the ports and break.
4 stroke engines don’t have these.
Everything else seems just fine.
John
4 stroke engines don’t have these.
Everything else seems just fine.
John
A few questions so I can crack on when the sealant arrives.
1, Do I use a business card for the gap between the flywheel & coil pick up ?
2, Currently I use 50:1 mix when using my tools but as this is a new cylinder & piston etc do I need to run it on the same mix or 40:1 / 30:1 to allow it to bed in ?
3, I don’t have any toque figures or a torque wrench anyway so the cap that fits over the crank seals etc do I just do them up right by hand & then just give them a slight tweak afterwards.
Have you got the service manual for this?
DIYnot Local
Staff member
If you need to find a tradesperson to get your job done, please try our local search below, or if you are doing it yourself you can find suppliers local to you.
Select the supplier or trade you require, enter your location to begin your search.
Please select a service and enter a location to continue...
Are you a trade or supplier? You can create your listing free at DIYnot Local
Similar threads
- Replies
- 42
- Views
- 772