
That looks very much like plasterboard to meLets hope I've got it totally wrong and its plasterboard ! (My obvious lack of building knowledge)
I never seen any insulation ... Ive checked all my pics too. I assume nothing can be done now

You are using an out of date browser. It may not display this or other websites correctly.
You should upgrade or use an alternative browser.
You should upgrade or use an alternative browser.
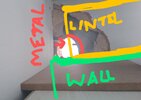
Core drilled through end of Lintel & metal showing
- Thread starter NBT
- Start date
Or is it like this so the green brick that was the support is not doing much as the lintel above has been cut away and now the white space is the main support which consists of untied brick and 2x3 with hardboard.
I judged it to be like this, with the new row of bricks now the only remaining support, with no certainty that the new row was tied in to the original.
Lets hope I've got it totally wrong and its plasterboard ! (My obvious lack of building knowledge)
I never seen any insulation ... Ive checked all my pics too. I assume nothing can be done now
If there is no insulation, then it must be added somehow. There would have been left over sections of insulation around, had it been added, even when what had been put in, had been covered over. Without it, that wall will be cold, and especially in a kitchen, mould will grow. Have him prove to you there is insulation in there, it's not optional, it's a building regulation. Have you made any progress with Building Control?
Lets hope I've got it totally wrong and its plasterboard ! (My obvious lack of building knowledge)
Hardboard is 1/8th of an inch thick about 3mm. Plasterboard 12mm or more. No reason why, with plasterboard on site, that he would use hardboard.
Thank you Aveatry for your diagrams
Its similar to your last diagram but there is more wall (green) underneath the lintel.
Hope my diagram's help
Its similar to your last diagram but there is more wall (green) underneath the lintel.
Hope my diagram's help
Attachments

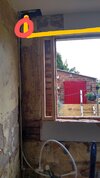
Then I do not see the massive danger as there looks to still be plenty of original supporting wall and not the case that its only the new extra brick taking the load.
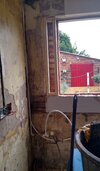
Its not ideal that they have cut away a section of lintel and I am wondering how the heck they managed to drill it and then why not stop when they realised i was the lintel and then carry on past and around the reinforcing bar, it must of been a nightmare going through that.
I get the distinct impression they do not know what they are doing. Not sure if I would trust them tieing in those bricks up the side because they will then actually be removing at least some of the support under the lintel while the tie in. But isn't there two lintels that should be there - one for the external and one for the internal
The reality is that you've been ripped off. None of that work has been done by qualified tradespeople. It ranges from shoddy to potentially dangerous.
You need a plan,. Assuming you have paid, which you shouldn't have, (and not by a credit or debit card where you could potentially go for a section 75 or chargeback), I would suggest you try to get the main issues resolved before they disappear.
You need them to:
Replace the timber "frame" with masonry (bricks or blocks), incorporating frame ties (also available from Screwfix) at every block (or every third brick), unless they can confirm that the lintel still has at least 150mm of bearing - I suspect they really won't want to do this due to the mess (but it can be done), so then you're into the realms of hoping what's left of the lintel supplemented by that first 4x2 wedged against the brickwork is adequate.
Rebuild the stack of bricks on the outside, toothing them into the original brickwork (someone knows how to do this as they've done it on the lower section where door was but only on one side - hopefully there's something to tie it in on the other side, but not as critical as the bit under the lintel). See if they'll put some insulation in the cavity.
If they are still engaged after this, tackle the shoddy stuff and keep going till they won't do any more.
You need to realise that they are conmen (you could be charitable and say clueless amateurs), not builders, and you will need to work hard to get as much work back from them as you can before they disappear (try hinting at extra work you want them to do to keep them keen, tell them what a good job they are doing with just those tiny exceptions that are really worrying you etc).
Forget about trading standards, building control etc - get them to try to fix as much as you can and complete everything that you've paid them for and get them out of your house. If you have any energy left, spend it trawling trusted family, friends and neighbours to find a proper builder.
I'm taken back how much everyone is helping me on here... I feel stupid saying I had no idea the standard of work is so appalling..... I assumed I had reputable builders from an advertised website who is supposed to have vetted them !
Thankfully you've all opened my eyes wth all your knowledge (and just in time ! ) .... I've taken notes on everything and will speak to the builder again.
Unfortunately I had paid by bank transfer as the work had been completed (I feel like a total idiot now).
Let's just hope the builder keeps his word and gets different traders in to sort this mess out !
Thank you to you all !!!!
Let's just hope the builder keeps his word and gets different traders in to sort this mess out !
Thank you to you all !!!!
You are welcome, but I still think you should try to have a quiet word with BC, or at least find someone of reputation with building experience, to inspect the work in person. What anyone can tell from photos is quite limited.
Last edited:
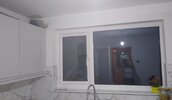
Insulation.... How do you put in insulation ie. where the door was bricked up ?
It should be in the cavity, between the bricks.
Toothing the bricks - Will the window need to be removed ?
I would expect that could be done carefully without disturbing the window.
Ok thank youIt should be in the cavity, between the bricks.
I would expect that could be done carefully without disturbing the window.
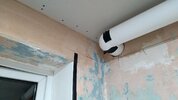
Here is mine I am working on right now, its 100mm as that is the size from the hood. I cannot remember where I read it or exact lengths the but for ducting runs you add up your ducting length you have and then for every 90 degree turn you add 1.5m to your length up to a maximum length of X m.
So having to add 1.5m to your total just shows how much the flow is affected just by a turn and that is in smooth pipe so imagine how much a flexible concertina pipe would affect the flow.
As well as round you can get 100x50 rectangle pipe and also wider and also rectangle to round adapters. S you may have options still.
Here is mine, the lintel above the window is not taking any weight in my case but I still swerved it out the side instead.
I fixed the pipe in with spray foam but first wrapped the pipe with a silicone release paper ( like the leftover paper from sticky back plastic roll ) so the foam would not stick to it, this was so I could still pull the pipe out for access for plastering. hence the temporary black tape.
Attachments
Wow what a difference how neat your venting is up to how the builder left mine !
Thanks again for your advice.
Mine is 150mm I assume a reducer can be used ie. to a 100mm.... is that the lowest it can be reduced by ? or can you use smaller pipes if space is limited ?
Thanks again for your advice.
Mine is 150mm I assume a reducer can be used ie. to a 100mm.... is that the lowest it can be reduced by ? or can you use smaller pipes if space is limited ?
DIYnot Local
Staff member
If you need to find a tradesperson to get your job done, please try our local search below, or if you are doing it yourself you can find suppliers local to you.
Select the supplier or trade you require, enter your location to begin your search.
Please select a service and enter a location to continue...
Are you a trade or supplier? You can create your listing free at DIYnot Local
Similar threads
- Replies
- 27
- Views
- 6K