Moving a radiator

Joined
30 Apr 2021
Messages
87
Reaction score
7
Country
United Kingdom
Dear Forum Members!


I am researching options for moving a radiator to an adjacent wall (increasing the pipe run by about 190cm).


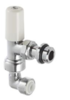
The existing radiator has the following fitting:
65278273.jpg


Here is how I imagine the process after watching some videos on Youtube :))))

· Identify the inflow hose on the radiator and mark it

· Drain the system

· Disconnect the radiator, take it off the wall, remove the Face-Fix cover from the wall

· ** this is where I am not sure of what will be behind the cover. 10mm to copper pipes adapter of some sort? **

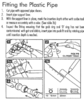
· Cut the copper pipes that may be behind the cover and fit “John Guest Speedfit Plastic Pipe - 15 or 22mm x 2m” to each one, using Speedfit connectors

· bring them to the new radiator’s location by running them into the plasterboard wall, making holes in the studwork

· ** again, here I need to somehow convert the flexi pipe to the 10mm Face-Fix with hoses – not sure how it’s done**


I would greatly appreciate if you could fill the gaps above and would be grateful for any bits of advice!

Thank you in advance!
 
Sponsored Links
I would say it’s speedfit behind as well, rather than copper. Might be best extending it with x2 10mm speedfit couplings and pipe? Or run the 10mm to skirting board level, and run copper to new location?
 
Thank you, I will try to close all the valves off and take one unit off the wall, to have a look inside!
 
Yeah, it'll probably be 10mm all the way, there would have been no need for them to convert anything. It would normally be 10mm runs from a 22mm or at worst 15mm backbone. Is it a relatively new build (<20yrs)?

:LOL: Funny though, just shows you how good some installers can be, that pipe guide is on back to front, they would usually recess into the wall with the seals at the top, not sit proud of the wall
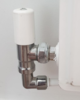
 :LOL:

th


Just extend the 10mm with couplers/elbows and inserts to where they need to go and redo as the existing.
 
Sponsored Links
Thank you both for your responses!

Yes, this is a newbuild - 2015.

Here is what I found:
photo_2021-11-05_15-34-03.jpg

photo_2021-11-05_15-33-56.jpg


I can't see far into the wall, but it does appear to be a 10mm pipe..
It would be fantastic if I could simply extend these 10mm pipes.

1) Could you please let me know if I am allowed to extend them by two meters each? Or would this significantly drop the pressure?
2) Is it possible for me to keep the run going above the skirtboard level, along the wall? In case I mess it up (as I am not an expert), any leaks would not be hidden within the wall, and it would be super-easy to revert to the original rad position.
3) Would you be so kind and recommend a good brand of fittings that I could use when working with these 10mm pipes?

Thank you again!
 
Personally I’d go skirting board level, preferably in copper, but that’s up to you and confidence. It wouldn’t drop the pressure, but iirc anything above 5m can give problems, possibly circulation and balancing issues.
 
Personally I’d go skirting board level, preferably in copper, but that’s up to you and confidence. It wouldn’t drop the pressure, but iirc anything above 5m can give problems, possibly circulation and balancing issues.

Thank you, Chris. I will keep looking for exact figures on the maximum 10mm-diameter run from the backbone.

Great to hear that I can run it at the skirtboard level.

If you or anyone else could share some recommendations for the fittings to use (type, brand) I would appreciate it.
 
  • Thanks
Reactions: CBW
The pipe should have some writing on it, eg hep2o or speedfit, so go with whatever the existing is and the same in fittings, however they are quite bulky.
 
Last edited:
Couple of elbows will turn the pipe to the direction you want it to go to.

Just use the same pipe, inserts and fitting as the pipe that's already there. Get pipe shears that will cut the pipe nice and clean and straight and make sure the pipe is properly inserted into the fittings.
 
One of the parts that I was after is the so-called '10mm bracket' (3 minutes 33 seconds mark):

Here is what it looks like on my radiator:
upload_2021-11-7_19-1-58.png


But I can't find this part on screwfix/toolstation at all! Could you please help me find out its proper name?
 

Attachments

  • upload_2021-11-7_19-1-36.png
    upload_2021-11-7_19-1-36.png
    641.8 KB · Views: 150
The one you pictured is a 10mm push fit angled (bent) lockshield, looks like the myson one tbh. The stem elbow pushfits into the bottom of the valve, as against a normal compression end on the lockshield. The compression is probably more secure though TBH.
 
Thank you, I now know what the part is. And it is a Myson! Impressive valve identification skills!

Can I please ask one more question?
I have brought up installation instructions for a Pegler Terrier Lockshield radiator valve angle pattern with push-fit elbow
upload_2021-11-7_21-41-53.png

And it suggests that I simply need to insert the liner into the pipe and push it in.. I appreciate that it's called a "push-fit", but is it actually enough to secure the connection??
For example, the standard push-fit connectors include a ring that you need to twist to secure the joint. In the example above there is no ring. Is pushing the hose into the elbow enough?
 

Attachments

  • upload_2021-11-7_21-40-10.png
    upload_2021-11-7_21-40-10.png
    138.5 KB · Views: 118
  • upload_2021-11-7_21-41-34.png
    upload_2021-11-7_21-41-34.png
    487 KB · Views: 78

DIYnot Local

Staff member

If you need to find a tradesperson to get your job done, please try our local search below, or if you are doing it yourself you can find suppliers local to you.

Select the supplier or trade you require, enter your location to begin your search.


Are you a trade or supplier? You can create your listing free at DIYnot Local

 
Sponsored Links
Back
Top