• Looking for a smarter way to manage your heating this winter? We’ve been testing the new Aqara Radiator Thermostat W600 to see how quiet, accurate and easy it is to use around the home. Click here read our review.

Would this be possible?

A wrap or 2 of GAS PTFE tape around the olive may do the job. It's leaking because the stem's been damaged.

If replacing you would need a 10mm HEP demounting tool and one of these -


That's a JG but you get them in HEP and other brands too.
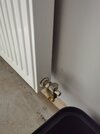
Thanks looks like another trip to screwfix :LOL:

So I'd need

Push through pipe

Hep20 key set

Speed fit 10-15mm

Would I also need a superseal?
Seal

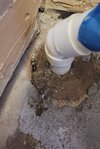
It's still got a small drip this is from overnight
IMG_20250808_111402.jpg
 
Last edited:
If that drip is from the left hand nut of the ISO valve fitted to the stem coupler and that's all the weeping you are getting then a wrap or 2 of gas PTFE tape over the olive should happily sort that out.
 
If that drip is from the left hand nut of the ISO valve fitted to the stem coupler and that's all the weeping you are getting then a wrap or 2 of gas PTFE tape over the olive should happily sort that out.
Well the water pressure was turned down ive increased it now and the drips a little faster but it's not much

I've got some loctite 55 ptfe tape.
 
That's usually cord not tape and can be a little bit of a farf on olives, it's more suited to threads but if you can cover the olive enough then it may do the job
I'll get some from screwfix my 2nd home atm. Does it matter using white ptfe rather than gas ptfe? I can pick a single white ptfe tape up or I'll have to order 10 of the gas PTFE tape.
 
Last edited:
No not really - just means you need to use more tape - if you have a Toolstation near it, they tend to open up beside each other these days, then they do gas tape individually.
 
No not really - just means you need to use more tape - if you have a Toolstation near it, they tend to open up beside each other these days, then they do gas tape individually.
Is it worth wrapping ptfe tape around the olive then a little joint compound or is that abit overkill?
 
Yup, not needed
Looking good so far.

I'm not looking forward to the next bit sorting out the pipe.

I've a little play with the existing pipe I can move it around and up a little, should this be something I fill? There's a slight opening.
 

Attachments

  • IMG_20250808_152359_1.jpg
    IMG_20250808_152359_1.jpg
    267.5 KB · Views: 32
Last edited:
Probably a daft question but is it best to work up with the plumbing or work down from the trap?
 
I've a little play with the existing pipe I can move it around and up a little, should this be something I fill? There's a slight opening.
Looks very much like you've uncovered a Drain Connector there, (a 4" cap for the underground drain with a suitably sized hole to accept the waste pipe.) It may be worth uncovering a bit more, see how the waste is connected, as it may prove better to replace the existing waste pipe through into the drain then try messing about with what's left of the old and risk losing the bottom section into the drain below.
 
Looks very much like you've uncovered a Drain Connector there, (a 4" cap for the underground drain with a suitably sized hole to accept the waste pipe.) It may be worth uncovering a bit more, see how the waste is connected, as it may prove better to replace the existing waste pipe through into the drain then try messing about with what's left of the old and risk losing the bottom section into the drain below.
I'd rather leave that alone I'm already nervous about trying to sort the plumbing out. I'm probably going to wrap tape round the bottom and it shouldn't drop through although it'll be interesting when trying to connect to it.
 
OK so yes you have a sealed system and yes that's the filling loop where the pressure is topped up, just make sure it works ok before bleeding anything.
I've bleed the radiator a little I think I'm doing it correct turn this with a flat head screwdriver and drained into bowl water looks clear.

Wish I'd left it alone now since bleeding it's had a small drip again from the connector?

IMG_20250818_174431.jpg

I've still not started the plumbing
 

Attachments

  • IMG_20250818_151354.jpg
    IMG_20250818_151354.jpg
    76 KB · Views: 25
  • IMG_20250818_151357.jpg
    IMG_20250818_151357.jpg
    125 KB · Views: 24
Last edited:
Ideally get one of these - A bleed key - you'll get them most places, SF/TS/B&Q/Etc or Amazon

1755550273031.png

Try not to use a screwdriver, they're not the best tool to use and can snap a tight bleed screw

Bleeding the rad should have nothing to do with the bottom connector, apart from the fact that there's pressurised water in there. The coupler is leaking because something isn't quite right and it'll either need tightened up or replaced.

2 different kinds probably due to the fact that one of the originals needed replaced.
 

If you need to find a tradesperson to get your job done, please try our local search below, or if you are doing it yourself you can find suppliers local to you.

Select the supplier or trade you require, enter your location to begin your search.


Are you a trade or supplier? You can create your listing free at DIYnot Local

 
Back
Top